
As I stepped into the kitchen with the scent of spring wafting through the open windows, inspiration struck for a delicious treat: Easter Mini Egg Nest Cupcakes. These delightful cupcakes not only embody the festive spirit of the holiday, but they’re also incredibly simple to whip up from scratch, making them perfect for both seasoned bakers and budding chefs alike. With a rich blend of chocolate and vanilla flavors, these adorable nests topped with colorful Cadbury mini eggs are sure to capture everyone’s hearts at your gathering. Plus, they can easily be adapted to suit gluten-free diets without sacrificing any of the fun! So, are you ready to dive into a baking adventure that promises to be as exciting as it is tasty?
Why Are Mini Egg Nest Cupcakes So Great?
Simplicity: This recipe is incredibly easy, making it perfect for bakers of all skill levels. There’s no complex technique required—you’ll be whipping up these cupcakes in no time!
Festive Appeal: With their bright colors and playful presentation, these cupcakes are a showstopper for any Easter celebration. They’re just as delightful to look at as they are to eat!
Flavor Explosion: The combination of rich chocolate and light vanilla creates a flavor profile that everyone will love, making these cupcakes a hit among guests of all ages.
Diet-Friendly Variations: People with dietary restrictions don’t need to miss out. You can easily adapt these cupcakes using gluten-free ingredients or dairy alternatives, ensuring everyone can enjoy a sweet treat.
Quick to Make: With a prep time that lets you spend more time with loved ones, these cupcakes make for a fantastic last-minute addition to your holiday festivities.
Family Fun: Get the kids involved in the decorating process! Piping the “grass” and placing the eggs is a fun activity that will bring everyone together—just like Cheesy Egg Toast or Savory Eggs Benedict.
Mini Egg Nest Cupcake Ingredients
• Get ready to bake deliciousness!
For the Cupcake Batter
- All-Purpose Flour – Provides structure and texture; substitute with gluten-free flour for a gluten-free version.
- Granulated Sugar – Adds sweetness to the cupcakes; try coconut sugar for a healthier option.
- Unsalted Butter – Contributes to the richness and moisture; can be replaced with vegetable oil for a dairy-free alternative.
- Milk – Hydrates the batter and adds tenderness; almond milk or another non-dairy milk works great for a dairy-free option.
- Baking Powder – A leavening agent for a light, fluffy texture; ensure it’s fresh for the best results.
- Salt – Enhances flavor and balances sweetness.
- Vanilla Extract – Brings a sweet, aromatic depth; feel free to explore other flavor extracts based on your preference.
- Eggs – Bind ingredients and add moisture; use flax eggs for a vegan alternative.
For the Decoration
- Chocolate Eggs (Crushed and Whole) – Adds texture and decoration; Cadbury mini eggs are ideal, but any similar chocolate candy will do.
- Icing Sugar (Powdered Sugar) – Sweetens frosting without graininess; powdered sugar alternatives can be used as well.
- Milk/Heavy Cream – Used to adjust frosting consistency; choose based on desired richness.
- Cocoa Powder – Adds chocolate flavor to the buttercream; you can omit it for a simple frosting.
- Green Food Coloring – Optional, but it gives a fun decoration resembling grass.
These Mini Egg Nest Cupcakes are a delightful treat that captures both the essence of Easter and the joy of baking!
Step‑by‑Step Instructions for Mini Egg Nest Cupcakes
Step 1: Preheat the Oven
Begin by preheating your oven to 350°F (175°C). This ensures that your Mini Egg Nest Cupcakes bake evenly and thoroughly. While the oven heats up, take a cupcake pan and line it with colorful cupcake liners, adding a cheerful touch to your baking adventure!
Step 2: Mix the Batter
In a large mixing bowl, combine the cupcake batter ingredients: all-purpose flour, granulated sugar, unsalted butter, milk, baking powder, salt, vanilla extract, and eggs. Beat the mixture on low speed for about 30 seconds, then increase to medium speed and continue mixing for 1 minute, or until everything is smoothly blended and creamy.
Step 3: Fill the Cupcake Liners
Carefully fill each cupcake liner about ¾ full with the batter, ensuring they all have a uniform amount for even baking. This helps create perfectly sized cupcakes. Slide the filled pan into the preheated oven and bake for 20–25 minutes. Keep an eye on them; they’re done when a toothpick inserted into the center comes out clean!
Step 4: Cool the Cupcakes
Once baked, remove the cupcake pan from the oven and allow the cupcakes to cool in the pan for about 5 minutes. Then, gently transfer them to a wire rack to cool completely. This is crucial for your Mini Egg Nest Cupcakes, as frosting warm cupcakes can lead to a melty mess!
Step 5: Prepare the Frosting
For the delicious frosting, beat softened unsalted butter in a bowl until creamy. Gradually add icing sugar and a splash of milk, mixing until you achieve a smooth consistency. Divide the frosting into two bowls: keep one as is for the chocolate cream, and mix green food coloring into the other to create the vibrant “grass” for your nests.
Step 6: Decorate the Cupcakes
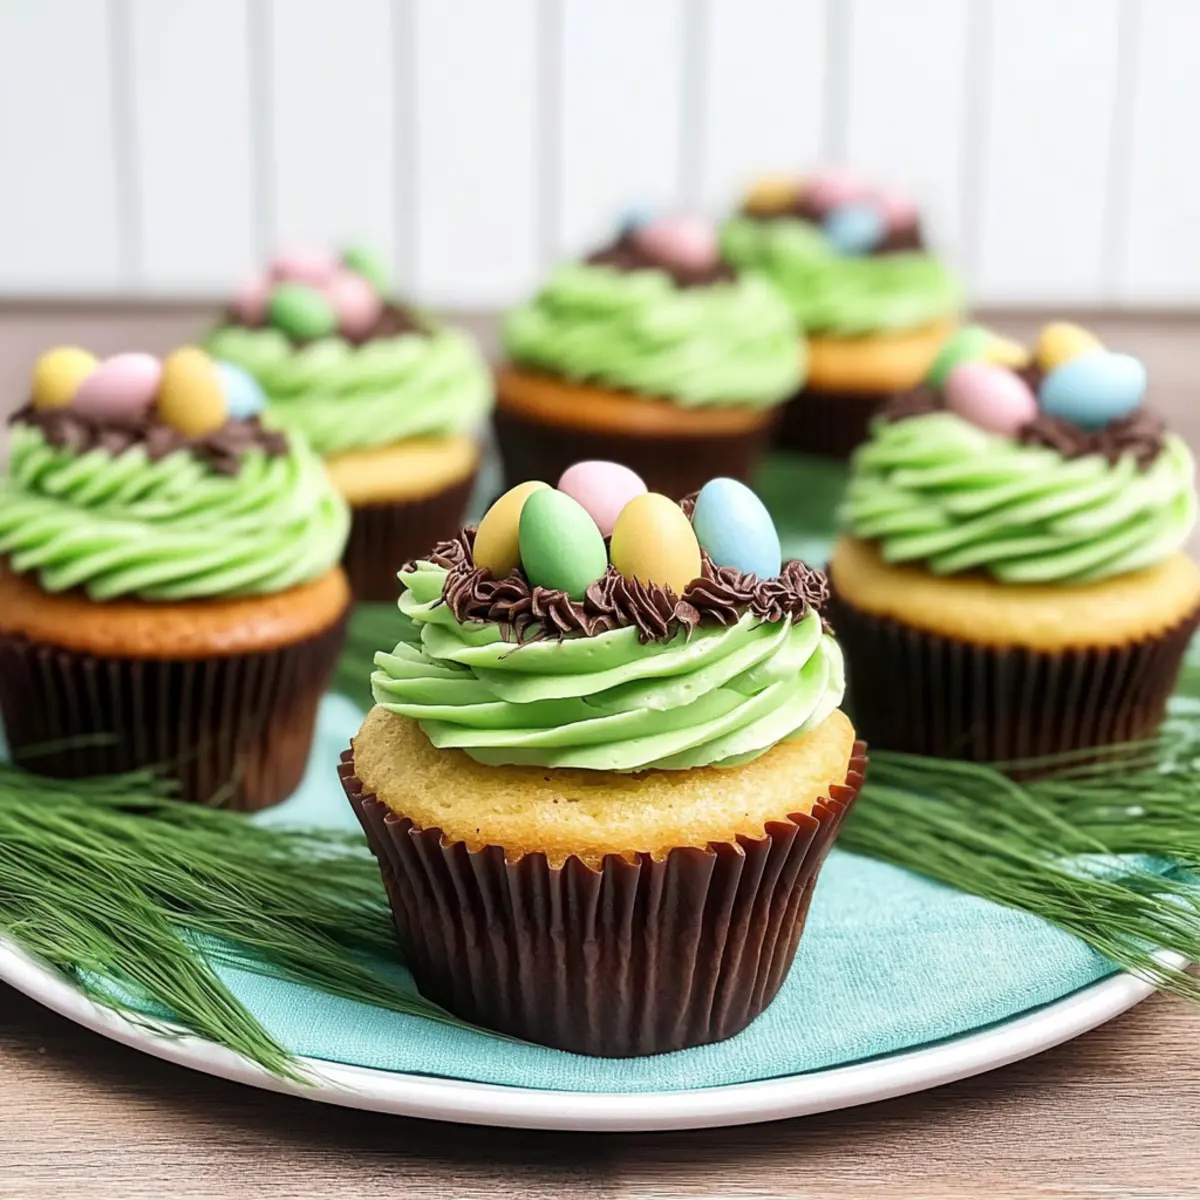
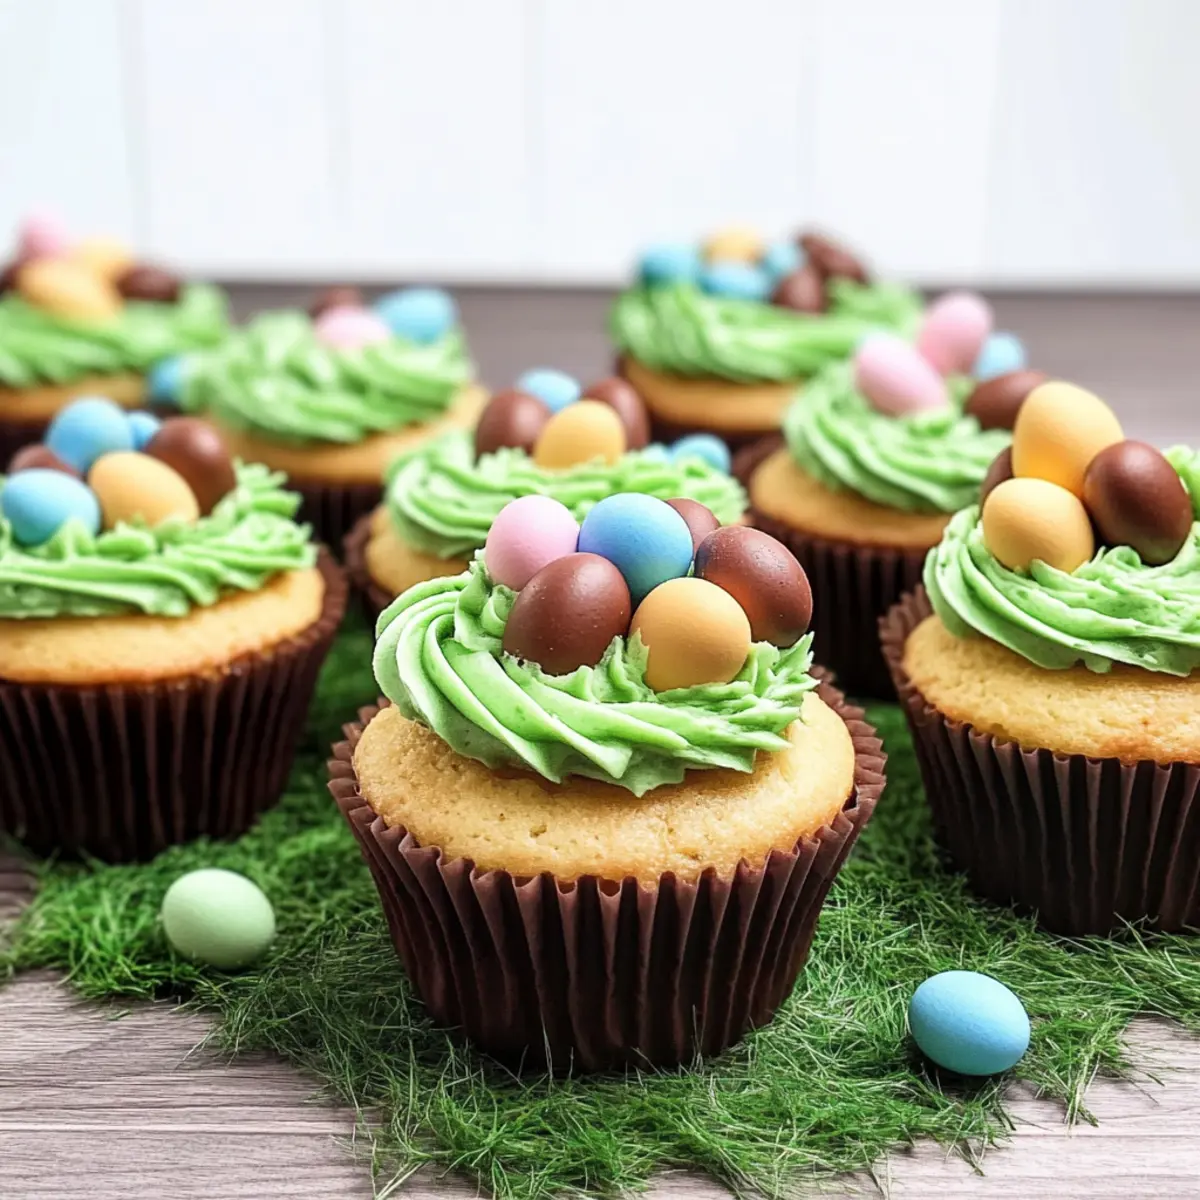
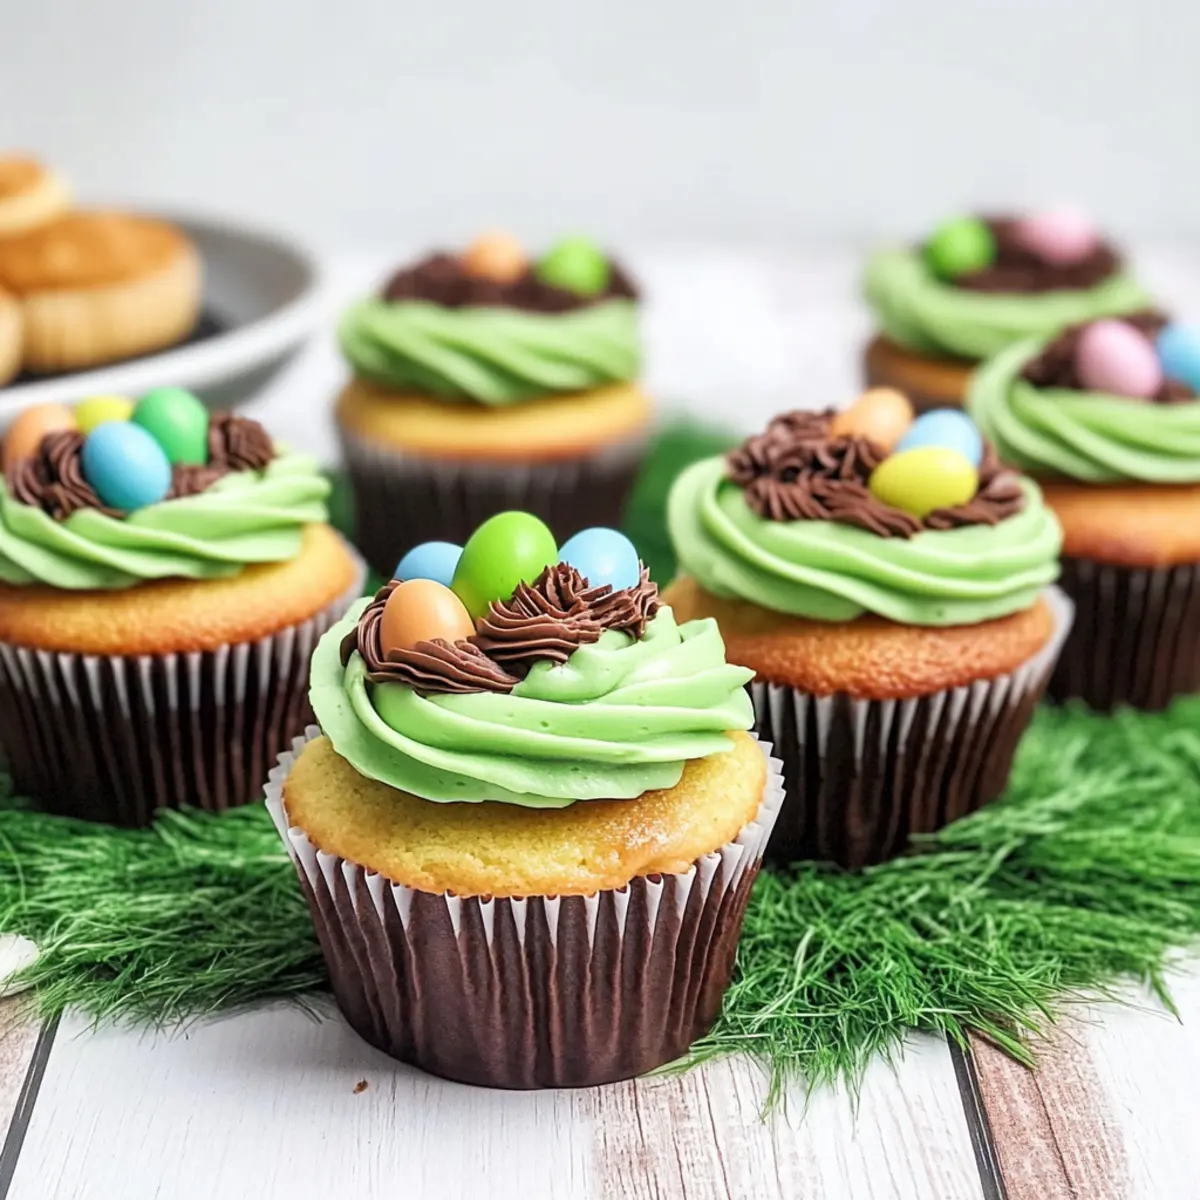
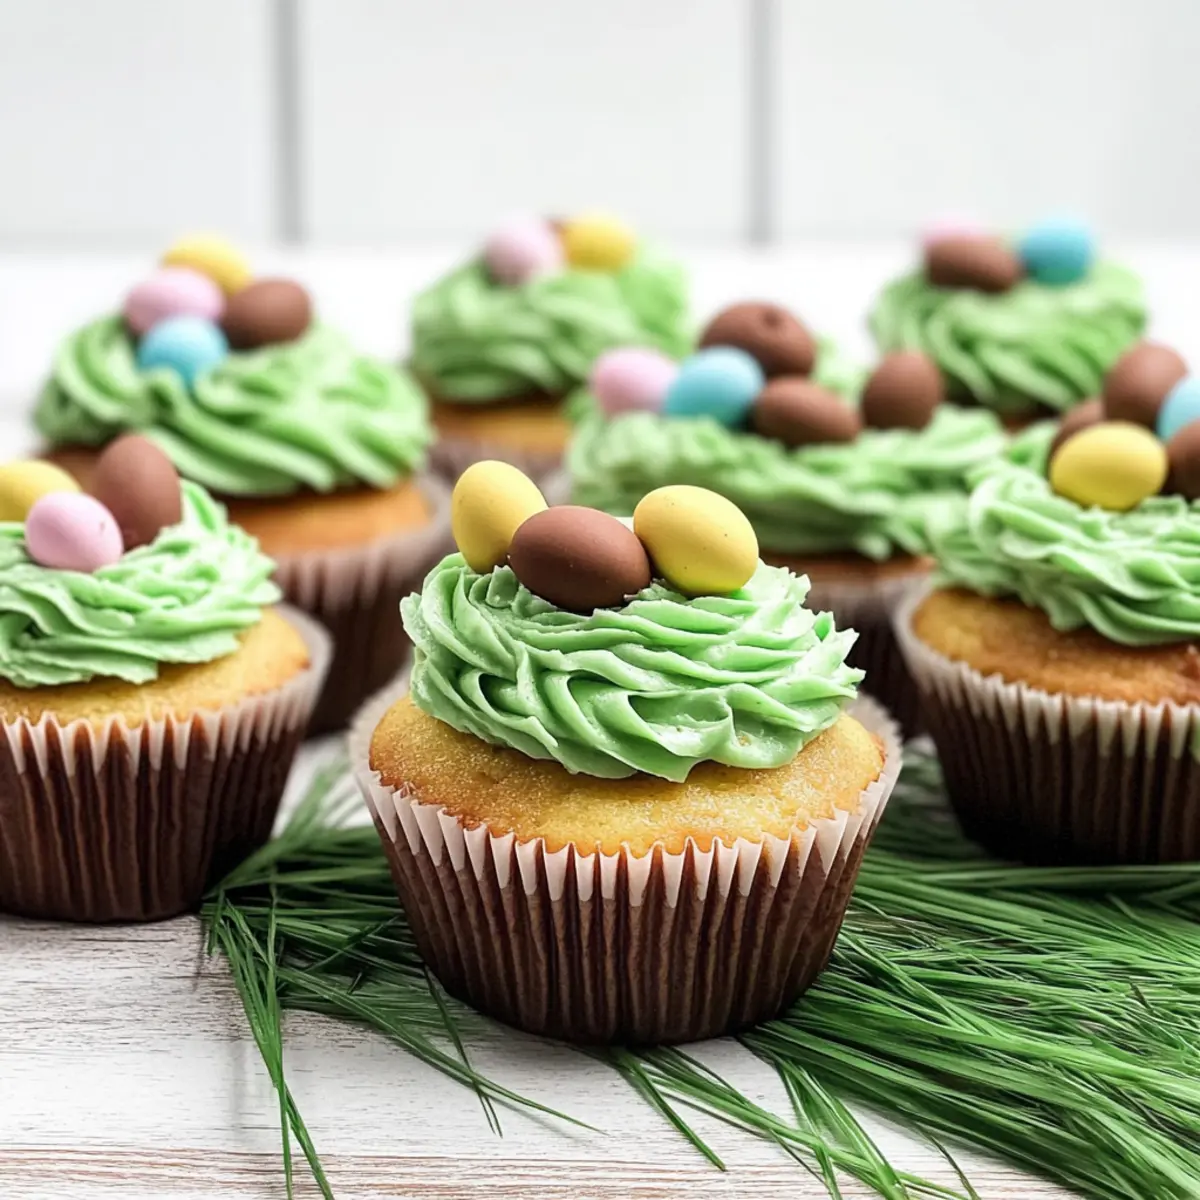
Using a piping bag fitted with an open star tip, pipe the green frosting onto the cooled cupcakes, spiraling it to resemble grassy nests. Next, take your chocolate frosting and swirl it on top to form the “nest”. This playful contrast not only enhances the presentation but also adds delightful flavors to your Mini Egg Nest Cupcakes.
Step 7: Add the Mini Eggs
Finish off your cupcakes by garnishing each nest with 3–4 whole Cadbury mini eggs, nestling them nicely into the icing. This final touch brings the celebration of Easter to life, making your cupcakes look both adorable and irresistible, ready to impress your family and friends!
What to Serve with Easter Mini Egg Nest Cupcakes
As you celebrate the joy of Easter, consider these delightful pairings that will elevate your cupcake experience.
-
Creamy Vanilla Ice Cream: The cool, creamy texture perfectly balances the sweetness of the cupcakes, creating a delightful contrast in every bite.
-
Chocolate Milkshake: A rich chocolate milkshake adds an indulgent touch, making each dessert moment really special. This pairing is a chocolate lover’s dream!
-
Fresh Strawberry Salad: A fresh salad with strawberries brings brightness and a hint of tartness, cutting through the decadence of the cupcakes.
-
Easter Bunny Fruit Platter: Serve a vibrant assortment of seasonal fruits shaped into fun designs for a colorful, healthy option that appeals to all ages.
-
Sparkling Lemonade: Refreshing and tart, sparkling lemonade awakens the palate and provides a sophisticated sparkle to your festive table.
-
Mini Carrot Cakes: Keeping with the holiday theme, mini carrot cakes are a lovely addition that brings a spiced sweetness alongside the cupcakes.
-
Coffee or Tea: A warm cup of coffee or herbal tea can enhance the creamy flavors of your cupcakes, creating a cozy atmosphere perfect for gatherings.
Make your Easter celebration unforgettable by serving these delectable creations alongside your Easter Mini Egg Nest Cupcakes!
Mini Egg Nest Cupcakes: Creative Variations
Make your Easter Mini Egg Nest Cupcakes truly your own with these delightful variations!
-
Gluten-Free: Replace all-purpose flour with a gluten-free blend to accommodate dietary needs without losing the yummy taste.
-
Dairy-Free: Swap out butter or milk for coconut oil and almond milk for a dairy-free treat that everyone can enjoy!
-
Sugar-Free: Try using a sugar substitute like monk fruit or erythritol to create lower-calorie cupcakes that don’t skimp on sweetness.
-
Flavor Twists: Add a touch of orange or lemon zest to the batter for a refreshing citrus flavor, making each bite even brighter!
-
Nutty Crunch: Fold in chopped nuts like pecans or walnuts for added texture and flavor. This twist enhances the cupcakes, making them more unique.
-
Decadent Chocolate: Replace half of the all-purpose flour with cocoa powder for a rich chocolate version. This flavor will excite chocolate lovers!
-
Spicy Kick: Incorporate a sprinkle of cinnamon or cayenne for a warm, unexpected twist. It adds depth to the flavor profile that pairs beautifully with chocolate.
-
Mini Egg Varieties: Use different chocolate eggs, or add crushed candies on top for a colorful and fun finish, elevating the visuals of your cupcakes.
These variations make it easy to personalize your cupcakes and share deliciousness with everyone during your celebrations! For more savory ideas, consider pairing these treats with a Bacon Egg Cheese for a breakfast-inspired feast or a delightful Savory Eggs Benedict for a brunch spread that everyone will love.
Make Ahead Options
These delightful Mini Egg Nest Cupcakes are a perfect choice for meal prep enthusiasts! You can bake the cupcakes up to 3 days in advance; simply allow them to cool completely, then store them in an airtight container at room temperature to maintain their moist texture. For the frosting, prepare it a day before and refrigerate it in a sealed container (remember to let it soften at room temperature before decorating!). When you’re ready to serve, just pipe the frosting onto the cooled cupcakes and top with the mini eggs. This approach allows you to enjoy stress-free festivities while still delivering a wonderfully festive dessert!
Expert Tips for Mini Egg Nest Cupcakes
-
Measure Accurately: Always measure your ingredients precisely. This ensures that your Mini Egg Nest Cupcakes rise perfectly and have the right texture.
-
Cool Completely: Allow cupcakes to cool completely before frosting. This prevents the icing from melting and gives you a beautifully finished cupcake.
-
Use Fresh Ingredients: Check the expiration date on your baking powder and vanilla extract. Fresh ingredients make a noticeable difference in flavor and texture.
-
Piping Tips: Opt for an open star piping tip for the green “grass” and a round tip for the chocolate swirl. This adds a professional touch to your cupcake design.
-
Customize Flavor: Feel free to add a touch of orange zest or cinnamon to the batter for an unexpected twist. Exploring flavors will make your Mini Egg Nest Cupcakes even more delightful!
How to Store and Freeze Mini Egg Nest Cupcakes
Room Temperature: Keep cupcakes in an airtight container at room temperature for up to 2 days to maintain freshness and moisture.
Fridge: If you prefer to keep them longer, store in the fridge for up to 4 days. Ensure they’re covered well to prevent drying out.
Freezer: For longer storage, freeze un-frosted cupcakes in a single layer for up to 3 months. Once ready to enjoy, thaw in the refrigerator overnight before frosting.
Reheating: If you want to warm them slightly, pop the frosting-free cupcakes in a preheated oven at 350°F (175°C) for about 5–10 minutes, or until they’re warmed through.
Mini Egg Nest Cupcakes Recipe FAQs
How do I choose the best flour for Mini Egg Nest Cupcakes?
Absolutely! For a classic version, all-purpose flour works best, providing the perfect structure and moist crumb. If you’re adapting for dietary needs, gluten-free flour blends can also yield delightful results with a bit of experimentation.
How should I store my cupcakes to keep them fresh?
Store your Mini Egg Nest Cupcakes in an airtight container at room temperature for up to 2 days. If you want to keep them longer, refrigerate them for up to 4 days, but be sure they are well-covered to avoid drying out.
Can I freeze Mini Egg Nest Cupcakes?
Very! To freeze, simply place the un-frosted cupcakes in a single layer in an airtight container or freezer bag. They can last for up to 3 months. When you’re ready to enjoy, thaw them overnight in the refrigerator, then frost as desired for a delicious treat.
What should I do if my cupcakes turn out dry?
If your Mini Egg Nest Cupcakes are dry, consider checking your ingredient measurements, especially the butter and milk, to make sure you haven’t skimped on moisture. Also, try to not overbake; a toothpick should come out clean but with a few moist crumbs for perfectly tender cupcakes.
Are there any ingredient substitutions for allergies?
Of course! If you need to avoid eggs, you can replace each egg with a flax egg (1 tablespoon of ground flaxseed mixed with 2.5 tablespoons of water, let it sit until gelatinous). For a dairy-free option, use almond milk or coconut milk in place of regular milk, and vegetable oil instead of butter to keep those Mini Egg Nest Cupcakes enjoyable for everyone.
Mini Egg Nest Cupcakes That Everyone Will Love this Easter
Ingredients
Equipment
Method
- Preheat your oven to 350°F (175°C) and line a cupcake pan with colorful cupcake liners.
- In a large mixing bowl, combine the cupcake batter ingredients and beat on low for 30 seconds, then medium for 1 minute.
- Fill each cupcake liner about ¾ full, then bake for 20–25 minutes, checking for doneness with a toothpick.
- Remove from the oven and cool in the pan for 5 minutes, then transfer to a wire rack to cool completely.
- For the frosting, beat softened unsalted butter until creamy, then add icing sugar and milk until smooth.
- Divide the frosting, mixing green food coloring into one bowl for the 'grass' and keeping the other chocolate.
- Pipe the green frosting onto the cooled cupcakes, then swirl on the chocolate frosting to form nests.
- Garnish each nest with 3–4 whole Cadbury mini eggs.
Leave a Reply