
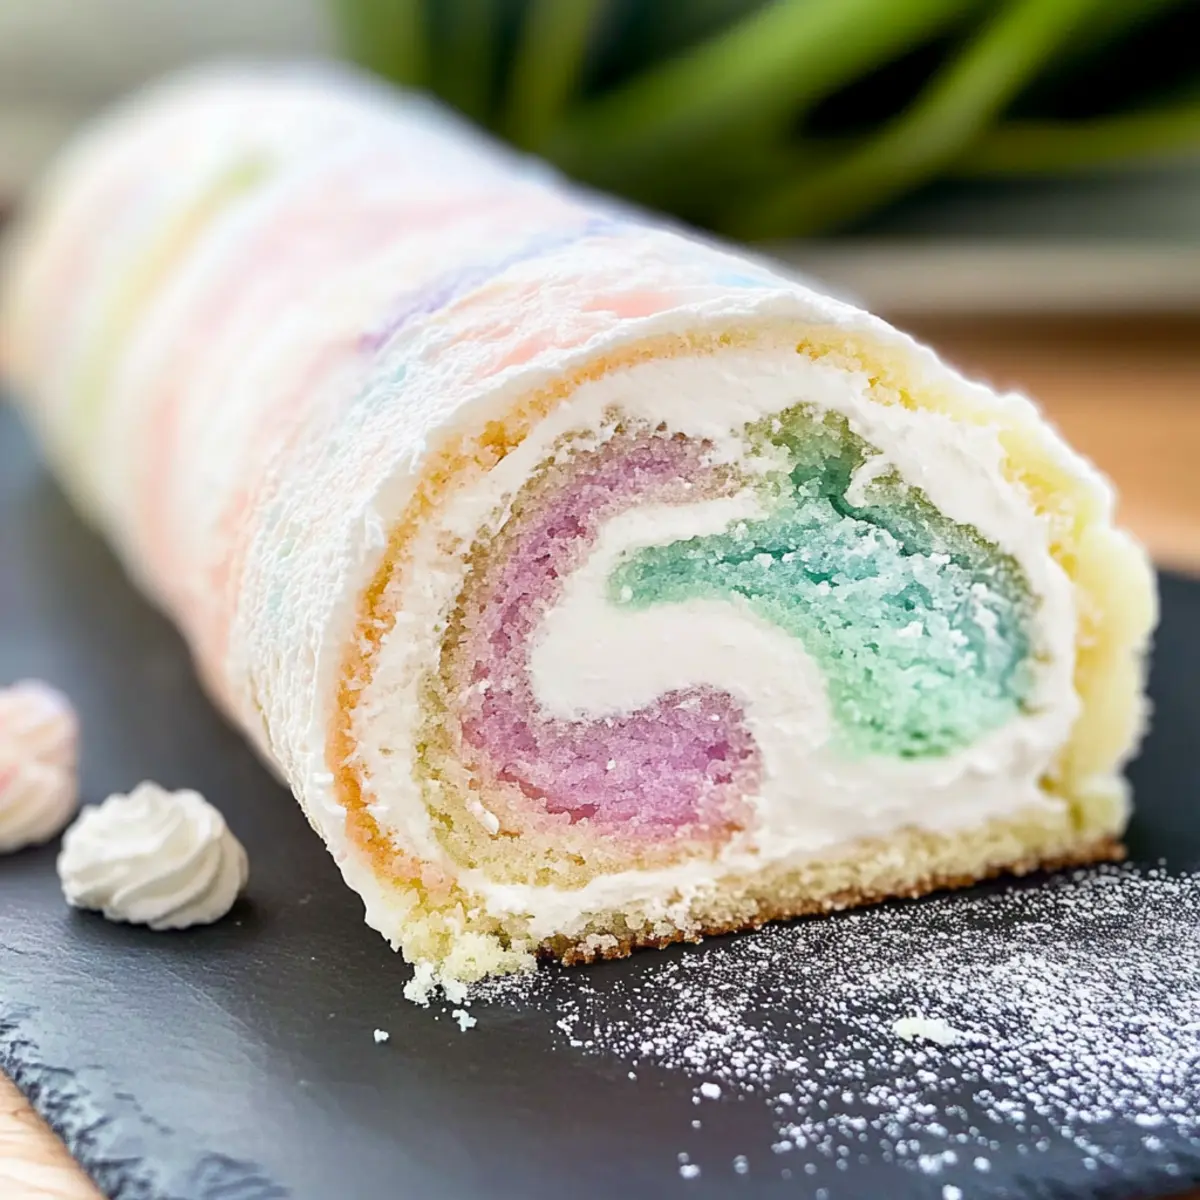
Stepping into the kitchen, I was hit by a wave of nostalgia as I thought about the fun childhood memories of decorating cakes, their colorful designs transforming simple desserts into edible art. Today, I’m excited to share my take on a delightful Watercolor Cake Roll that marries the airy texture of vanilla sponge cake with a stunning pastel-hued appeal. This easy baking project not only brightens up any gathering but also doubles as a perfect centerpiece for your dessert table. With just a handful of simple ingredients and straightforward steps, you’ll be able to create a showstopping treat that is both light and visually captivating. Ready to impress your family and friends? Let’s dive into this creative adventure and elevate your dessert game together!
Why is This Cake Roll So Special?
Lightness: The Watercolor Cake Roll features a fluffy sponge cake that melts in your mouth, leaving your taste buds dancing for more.
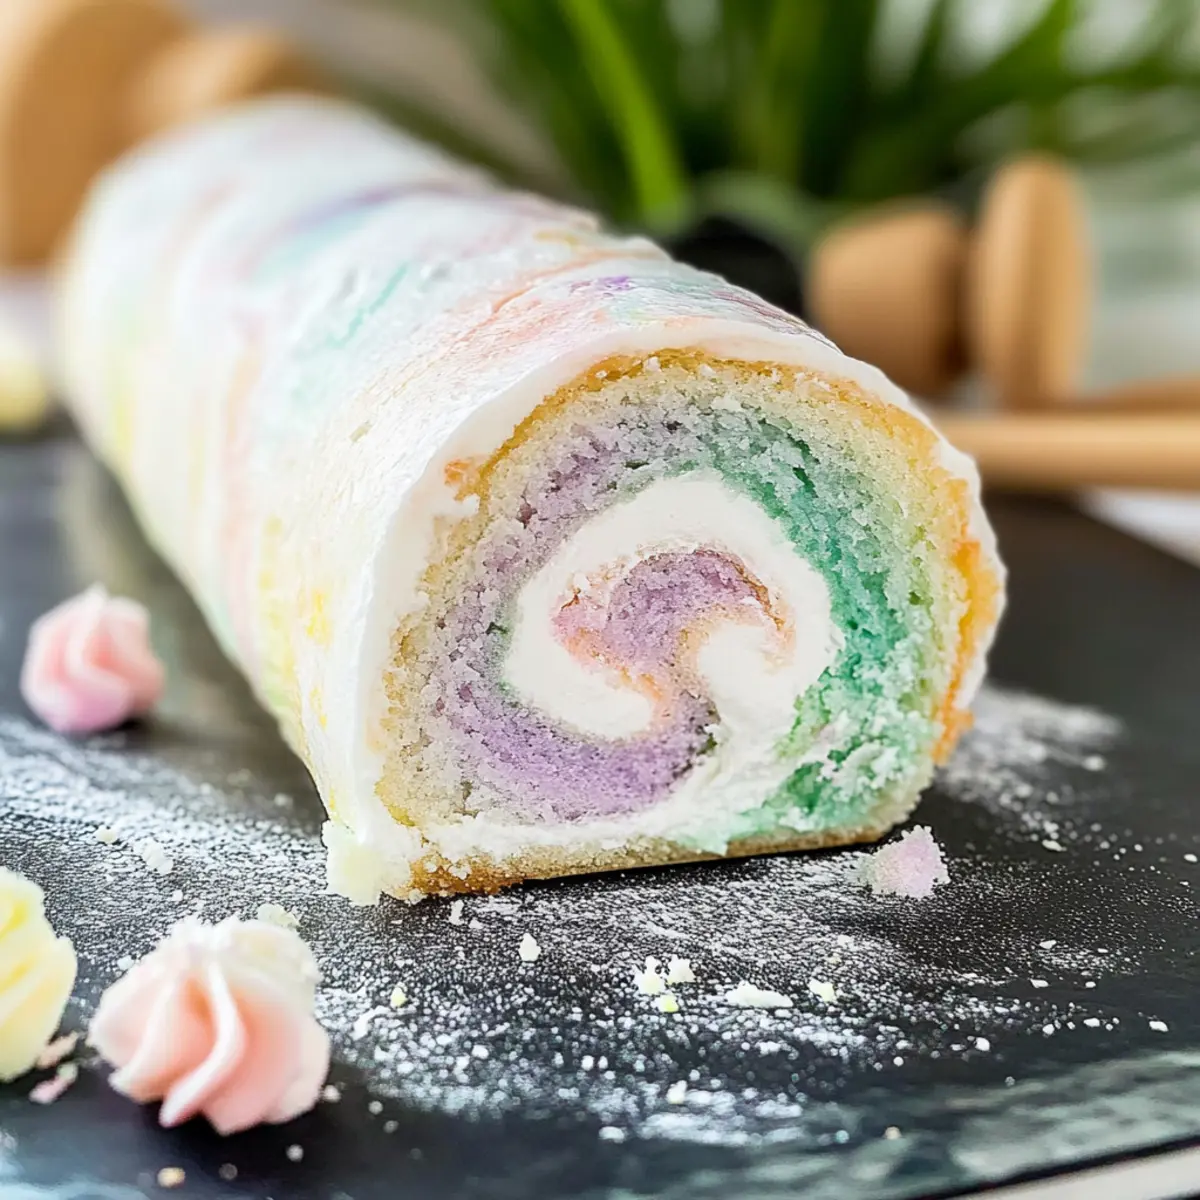
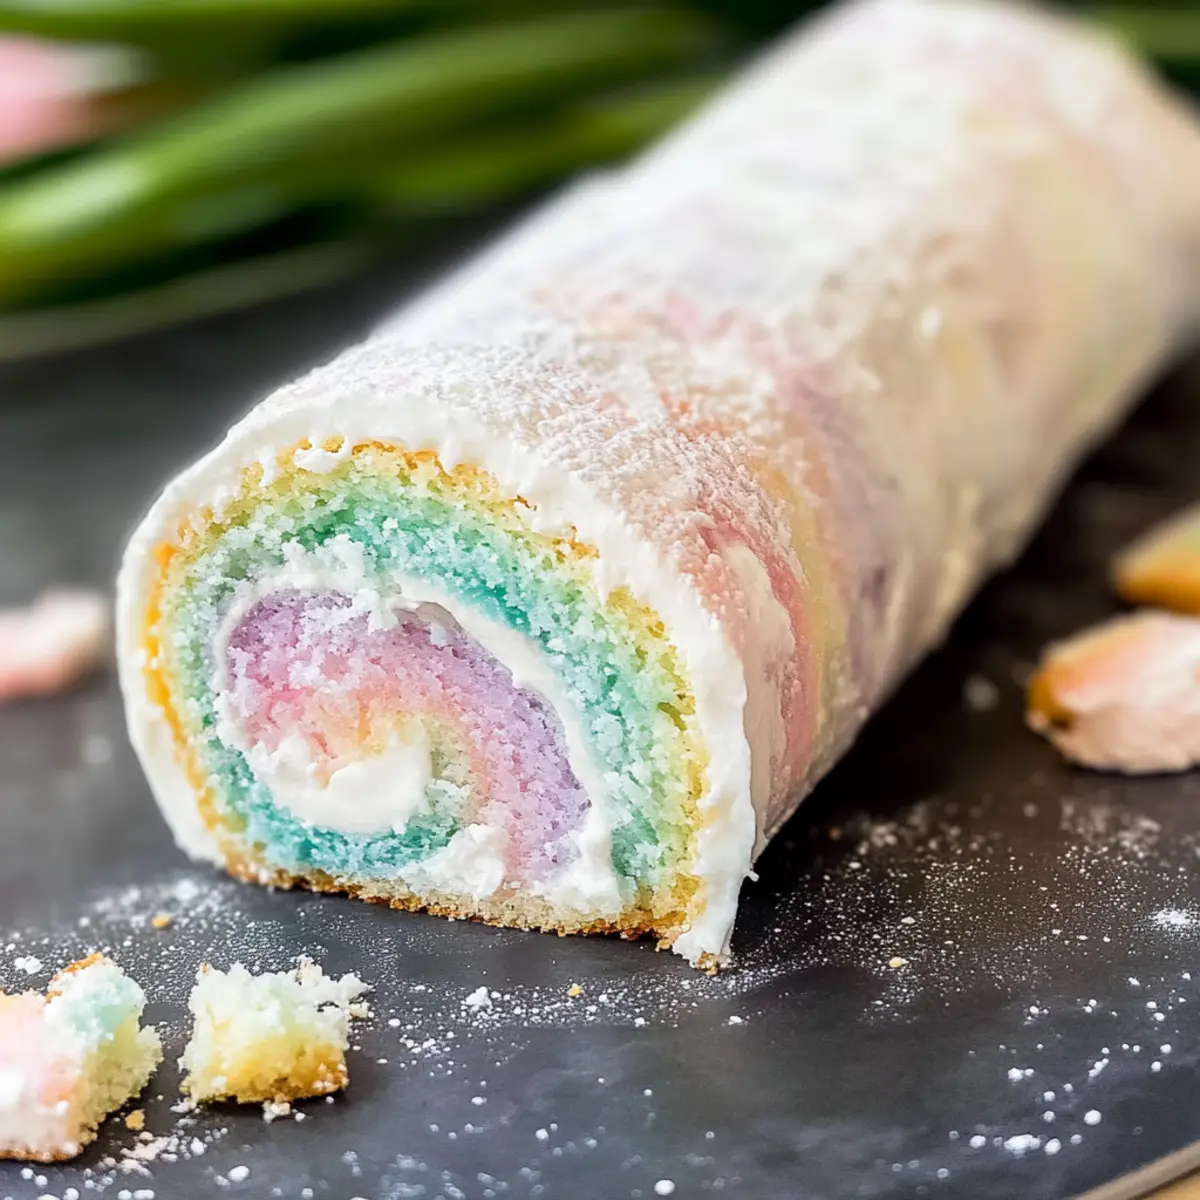
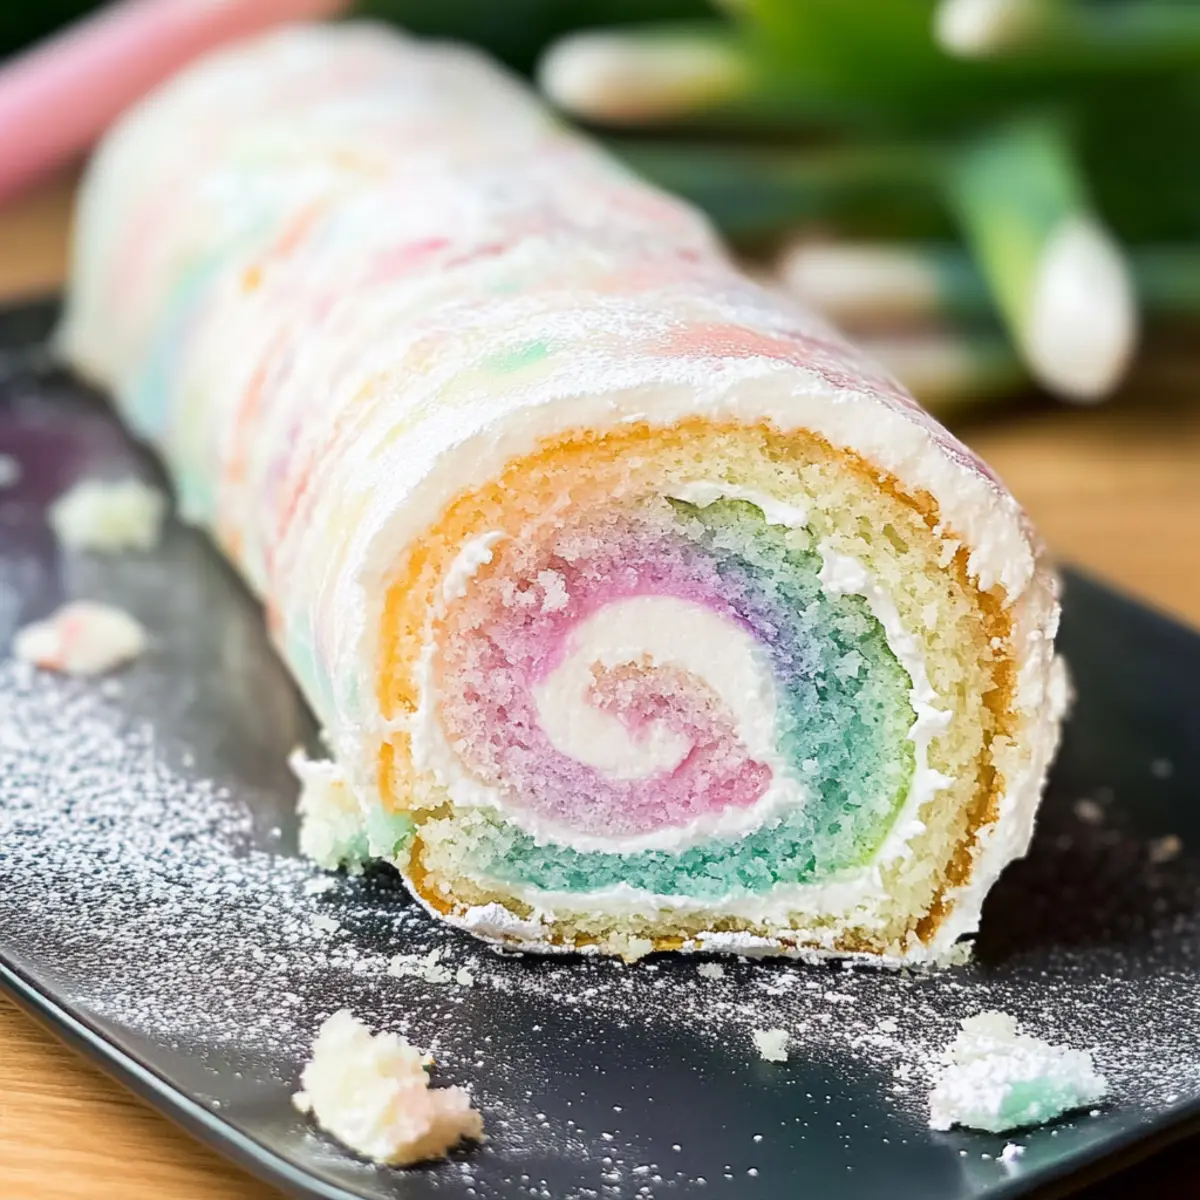
Visual Appeal: Its stunning pastel design isn’t just for show; it transforms an ordinary dessert into a masterpiece that will captivate your guests.
Simplicity: This recipe is designed for home bakers of all levels, using straightforward techniques that yield impressive results without the stress.
Versatility: Feel free to mix up color combinations or add fruit layers for a personal touch, making this cake suitable for any occasion.
Crowd-Pleaser: Whether at a birthday party or a cozy gathering, this cake is sure to be the talk of the table! Serve it alongside a slice of my delicious Cinnamon Roll Coffee Cake for a truly delightful dessert spread.
Watercolor Cake Roll Ingredients
For the Cake
- Cake Flour – Provides structure; you can substitute with all-purpose flour mixed with cornstarch for a similar effect.
- Unsalted Butter – Adds richness and moisture; margarine or vegan butter can work for a dairy-free version.
- Granulated Sugar – Sweetens the cake; coconut sugar can be used for a lower glycemic option.
- Large Eggs – Ensures moisture and structure; use egg replacers for a vegan alternative.
- Cornstarch – Adds tenderness to the cake; it’s optional but recommended for best results.
For the Color Paste
- Egg White – Essential for the color paste base; aquafaba can serve as a vegan substitute.
- Powdered Sugar – Helps to create a smooth color paste; granulated sugar can be used but affects texture.
- Color Gel – Creates the beautiful watercolor effect; liquid food coloring can be a substitute, just watch the texture.
For the Whipped Cream Filling
- Heavy Whipping Cream – Used to make the luscious filling; coconut cream can work for a dairy-free version.
- Granulated Sugar (for whipped cream) – Sweetens the cream; confectioners’ sugar can also do the trick.
- Vanilla Extract (optional) – Enhances flavor; almond extract can replace it for a unique twist.
- Cream of Tartar (optional) – Stabilizes egg whites for a fluffier texture; lemon juice is a great alternative.
Enjoy your journey in crafting the beautiful and delicious Watercolor Cake Roll!
Step‑by‑Step Instructions for Watercolor Cake Roll
Step 1: Prepare Color Paste
Begin by lining a baking sheet with a silicone mat or parchment paper to create a non-stick surface. In a medium bowl, mix together softened unsalted butter, powdered sugar, and egg white until smooth and creamy. Add a few drops of color gel to your mixture, swirling it to create a beautiful marbled pattern. Spread this colorful mixture evenly on the prepared sheet and place it in the fridge for about 30 minutes to set.
Step 2: Make the Cake Batter
While the color paste chills, preheat your oven to 450°F (232°C). In a separate bowl, whisk together cake flour and cornstarch until well combined. Using a stand mixer, beat large egg yolks and granulated sugar on medium speed until the mixture becomes pale and thick, which should take about 5 minutes. Gradually fold in the flour mixture, being careful not to deflate your airy batter for the Watercolor Cake Roll.
Step 3: Whip Egg Whites
In a clean mixing bowl, whip the egg whites until they’re frothy—this should take about 2 minutes. Add cream of tartar to stabilize the egg whites, then continue beating until stiff peaks form, approximately another 3 minutes. Gently fold the whipped egg whites into the yolk and flour mixture, ensuring not to overmix, as you want to keep the batter light and airy for that perfect sponge texture.
Step 4: Bake the Cake
Once your batter is ready, take the chilled color paste from the fridge and spread the cake batter evenly over it. Bake in your preheated oven for 7 minutes, watching for a light golden color around the edges. As soon as it’s done baking, remove it from the oven and quickly roll the cake, using a clean kitchen towel dusted with powdered sugar to prevent sticking. This is a key moment for your Watercolor Cake Roll!
Step 5: Cool and Fill
Allow the cake to cool in the rolled position for about 10 to 15 minutes; this helps set its shape. Once cool, gently unroll the cake and spread a generous layer of whipped cream on top. Roll the cake back up tightly, ensuring the filling is secured within. Place the rolled cake seam-side down in the fridge for at least 30 minutes to firm up before slicing, making for a beautiful presentation.
What to Serve with Watercolor Cake Roll
Elevate your dessert experience with delightful accompaniments that enhance the flavors and presentation of this enchanting treat.
- Fresh Berries: Plump berries, like strawberries or blueberries, add a burst of natural sweetness and a pop of color, enhancing the cake’s visual appeal.
- Vanilla Ice Cream: A scoop of creamy vanilla ice cream perfectly complements the sponge’s lightness, offering a delightful contrast in temperature and texture.
- Whipped Cream Topping: Adding an extra dollop of whipped cream on the side not only echoes the filling but also adds a rich, airy touch to every slice.
- Fruit Compote: A drizzle of fruit compote, such as raspberry or mango, introduces a tangy element that beautifully counters the sweetness of the cake roll.
- Mint Leaves: Fresh mint leaves provide a refreshing garnish that elevates the dish, enhancing both the aesthetic and the flavor profile.
- Elderflower Cordial: Serve with a glass of elderflower cordial to bring a fragrant and floral element to your dessert, refreshing the palate beautifully.
- Chocolate Drizzle: A light drizzle of melted chocolate adds a rich flavor twist, contrasting with the lightness of the watercolor cake and making every bite indulgent.
Expert Tips for a Perfect Watercolor Cake Roll
Choosing Flour Wisely: Use cake flour for optimal texture, as it helps create a light and fluffy sponge. Substituting with all-purpose flour can lead to a denser outcome.
Rolling Technique: Always roll the cake while it’s hot to prevent cracking. A clean dish towel dusted with powdered sugar keeps the surface non-stick for a smooth roll.
Whipping Egg Whites: Ensure your bowl is completely clean to achieve stiff peaks when whipping egg whites. This is crucial for a fluffy Watercolor Cake Roll.
Chill Before Serving: Refrigerate the filled cake roll for at least 30 minutes before slicing. This firms up the whipped cream filling and makes for cleaner cuts.
Color Variations: Don’t hesitate to experiment with different color gels. Layering various shades can add a personal touch and seasonal flair to your cake roll.
Storage Strategy: Store any leftovers in the fridge. The Watercolor Cake Roll is best enjoyed fresh, but it can last up to 2 days if kept sealed.
Watercolor Cake Roll Customization Ideas
Feel free to bring your own flair to the Watercolor Cake Roll by exploring these delightful variations and substitutions!
-
Dairy-Free: Use margarine or vegan butter in place of unsalted butter to cater to dietary needs. This still ensures a moist, flavorful cake!
-
Gluten-Free: Substitute cake flour with a 1:1 gluten-free flour blend, helping those with gluten sensitivities enjoy this treat without compromising taste.
-
Different Colors: Mix up the color gels to create vibrant seasonal themes. Think warm autumn shades or festive red and green for holidays!
-
Fruit Layers: Add a layer of fruit preserves, like raspberry or strawberry, beneath the whipped cream for flavor and a pop of color.
-
Flavored Whipped Cream: Sweeten the deal by incorporating flavored whipped creams such as chocolate or coffee for a rich twist. This can completely transform the dessert!
-
Texture Boost: For added crunch, sprinkle in some crushed nuts or chocolate chips in the whipped cream filling before rolling the cake.
-
Fruity Twist: Fold in some finely chopped fresh fruits like strawberries or peaches into the whipped cream for a refreshing surprise in every bite.
Experiencing this Watercolor Cake Roll can become a personal canvas for creativity! Don’t forget to pair your delightful creation with a slice of my stunning Blueberry Cheesecake Crumble or the irresistible Pumpkin Cheesecake Cookies for an awe-inspiring dessert spread. Enjoy!
Storage Tips for Watercolor Cake Roll
Fridge: Keep your Watercolor Cake Roll in an airtight container in the fridge for up to 2 days. This will help maintain its moisture and preserve the vivid colors.
Freezer: For longer storage, wrap the cake tightly in plastic wrap followed by aluminum foil before placing it in the freezer. It can last for up to 2 months—just thaw in the fridge before serving.
Reheating: If desired, serve cold for the best textures. Avoid reheating, as it may alter the cake’s delicate structure and moisture content.
Room Temperature: If left out, the Watercolor Cake Roll can sit at room temperature for no more than 2 hours. After that, be sure to refrigerate any leftovers to keep them fresh.
Make Ahead Options
You can easily prepare components of the Watercolor Cake Roll ahead of time, making it a fantastic option for busy bakers! To save time, create the colorful paste and refrigerate it for up to 24 hours before filling the cake. Additionally, you can make the whipped cream filling and store it in an airtight container in the fridge for up to 3 days. When you’re ready to assemble, simply bake the cake and roll it as instructed, then chill for at least 30 minutes for easier slicing. This way, your dazzling Watercolor Cake Roll will be just as delicious while saving you precious time on the day of serving!
Watercolor Cake Roll Recipe FAQs
What is the best way to select ripe ingredients for this recipe?
Absolutely! When choosing eggs, look for ones with clean, uncracked shells and a sell-by date no more than a few weeks away. For the butter, opt for high-quality unsalted butter to control the salt content in your cake. If you’re using fruit preserves, select ones that are vibrant in color without added preservatives—freshness really matters here!
How should I store my Watercolor Cake Roll?
For short-term storage, place your Watercolor Cake Roll in an airtight container in the refrigerator for up to 2 days. This helps maintain its moisture and keeps those lovely colors vibrant. If you’re storing it for longer, wrap the roll tightly in plastic wrap and then in aluminum foil, and it will stay fresh for up to 2 months in the freezer. Just be sure to thaw it in the refrigerator before serving!
Can I freeze the Watercolor Cake Roll?
Absolutely! Freezing the Watercolor Cake Roll is a great way to keep it for future enjoyment. After rolling and before slicing, wrap it tightly in plastic wrap followed by aluminum foil. When ready to enjoy, thaw it overnight in the fridge before slicing to allow the texture and flavors to develop again. This way, your cake will taste as delightful as fresh!
What can I do if my cake cracks when rolling?
Very! If your Watercolor Cake Roll cracks, it often means it wasn’t rolled while hot enough or too tightly. To prevent future mishaps, make sure to roll the cake immediately after taking it out of the oven while it’s still warm. Use a clean dish towel dusted with powdered sugar to help it roll smoothly without sticking. If it does crack, you can still patch it up with whipped cream when you fill it!
Are there any dietary restrictions I should consider with this recipe?
Definitely! If you’re catering to dietary restrictions, you can easily substitute ingredients. Use vegan butter and aquafaba for the egg whites to accommodate a vegan diet. Substitute coconut cream for heavy whipping cream to make it dairy-free. For allergies, always ensure that the color gels and other ingredients are free from allergens, and feel free to omit any additive that doesn’t fit your guests’ needs.
How long can I keep leftovers at room temperature?
The Watercolor Cake Roll can sit at room temperature for up to 2 hours. After that, it’s best to refrigerate any leftovers to keep them fresh. If you find any leftovers after that time, you may want to discard to ensure safety and quality. Enjoy your delightful creation!
Create a Stunning Watercolor Cake Roll That Wows Every Time
Ingredients
Equipment
Method
- Begin by lining a baking sheet with a silicone mat or parchment paper. In a bowl, mix softened unsalted butter, powdered sugar, and egg white until smooth. Add color gel and spread on the prepared sheet. Chill for 30 minutes.
- Preheat your oven to 450°F (232°C). Whisk together cake flour and cornstarch. Beat egg yolks and sugar until pale and thick, about 5 minutes. Fold in the flour mixture carefully.
- Whip egg whites until frothy, about 2 minutes. Add cream of tartar and whip until stiff peaks form, another 3 minutes. Fold whipped egg whites into the yolk mixture gently.
- Spread the cake batter evenly over the chilled color paste. Bake for 7 minutes until light golden. Roll the cake quickly with a towel dusted with powdered sugar.
- Cool the cake in the rolled position for 10 to 15 minutes. Unroll, spread whipped cream on top, and re-roll tightly. Chill for 30 minutes before slicing.
Leave a Reply