
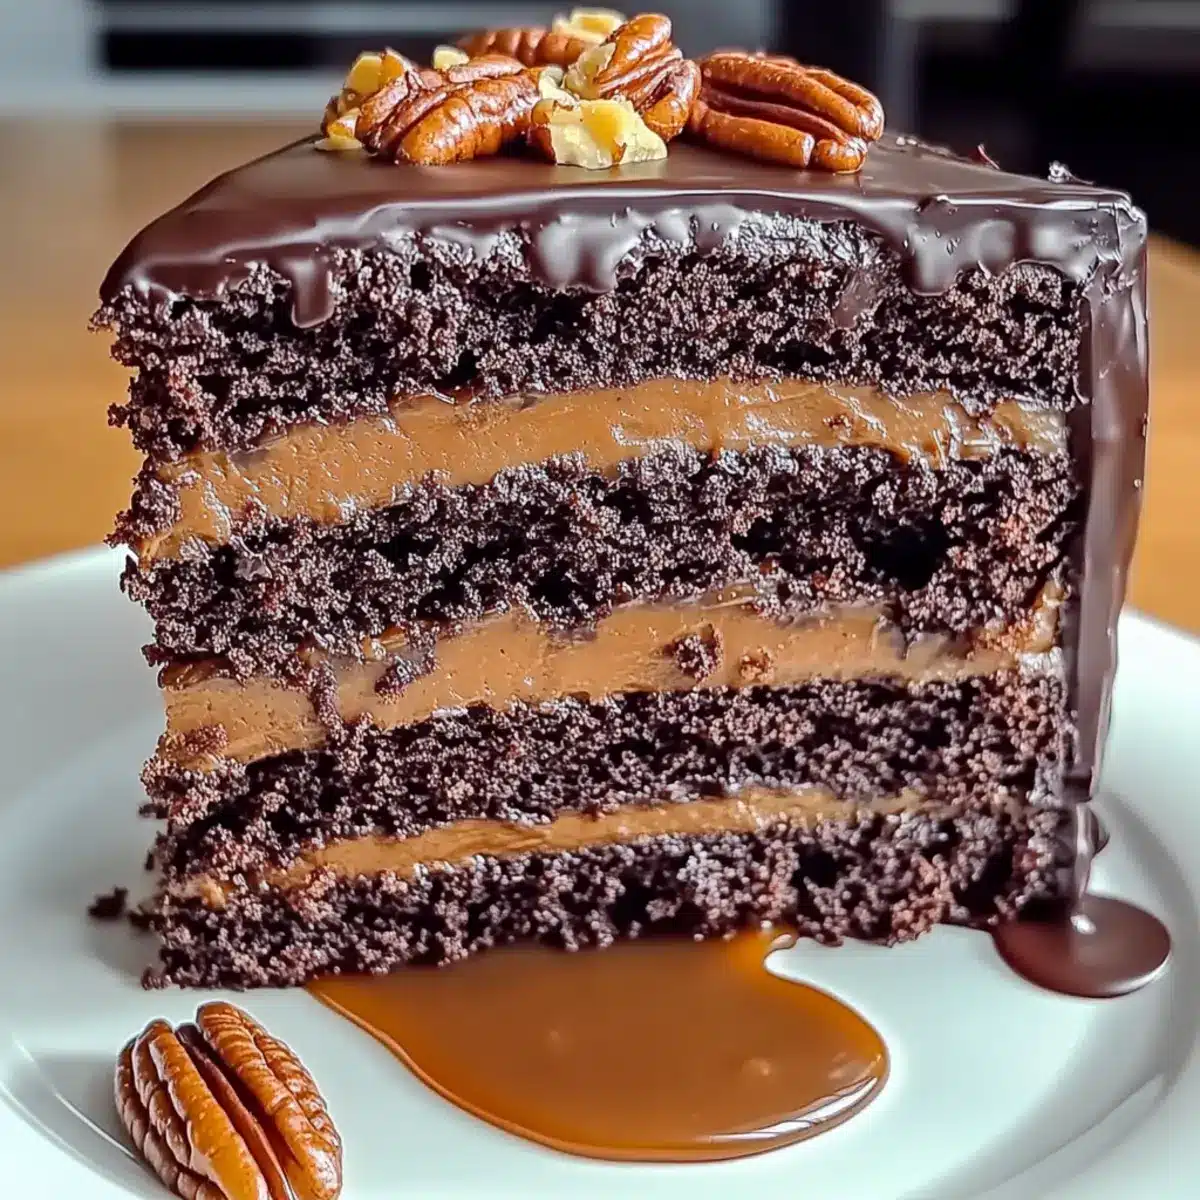
“Chocolate, caramel, and pecans”—together, they weave a story of indulgence and nostalgia that warms the heart and delights the taste buds. This Chocolate Turtle Dream Cake captures that essence in each decadent slice, making it a showstopper at any gathering. What’s more, it’s beginner-friendly, allowing even novice bakers to craft stunning desserts with ease. The combination of rich chocolate layers with gooey caramel and crunchy pecans is not only a feast for the senses but also a delightful way to bring family and friends together. Plus, with customizable options, you can put your unique twist on this dessert, whether that’s opting for gluten-free flour or experimenting with different nut varieties. Ready to recreate this crowd-pleaser that’s sure to impress everyone around your table? Let’s dive into the recipe and embark on this sweet adventure together!
Why is this cake a must-try?
Decadent Layers: This Chocolate Turtle Dream Cake features sumptuous layers of moist chocolate that melt in your mouth, complemented by rich caramel and crunchy pecans for an indulgent experience.
Beginner-Friendly: Crafted with simplicity in mind, this recipe invites even novice bakers to shine in the kitchen without feeling overwhelmed.
Crowd-Pleaser: Perfect for any occasion, it’s a dessert that will impress at birthdays, holidays, or casual get-togethers, leaving everyone asking for seconds!
Customizable Options: Feeling adventurous? Swap in gluten-free flour or different nuts to tailor the recipe to your preferences.
Easy to Store: This cake keeps well, allowing you to make it ahead of time—ideal for planning a dessert without any last-minute stress.
Dive into the joy of baking with this delightful recipe and consider pairing it with a slice of Cheese Pound Cake for a full dessert table experience!
Chocolate Turtle Dream Cake Ingredients
For the Cake
- All-Purpose Flour – Provides structure to the layers; use gluten-free flour for a sensitive version.
- Granulated Sugar – Adds sweetness and moisture; no substitutions recommended.
- Cocoa Powder – Infuses the cake with deep chocolate flavor; opt for high-quality cocoa for superior results.
- Baking Soda – Acts as a leavening agent; ensure freshness for optimal rise.
- Baking Powder – Works with baking soda to lift the cake; check the expiration date.
- Salt – Enhances flavor; try sea salt for a gourmet touch.
- Eggs – Bind and retain moisture; at room temperature for better blending works best.
- Vegetable Oil – Adds richness; swap for coconut oil for a unique twist.
- Buttermilk – Contributes moisture and tenderness; substitute with milk plus vinegar if needed.
- Vanilla Extract – Deepens flavor richness; either extract or paste works well.
- Hot Water – Ensures moisture in the batter; don’t skip this essential ingredient!
For the Filling
- Caramel Sauce – Acts as a sweet, gooey layer; choose store-bought or homemade for personal flair.
- Chopped Pecans – Adds crunch and nutty richness; use according to preference for texture.
For the Ganache
- Semi-Sweet Chocolate – Creates a rich, smooth ganache; cool slightly before pouring for best visual impact.
- Heavy Cream – Mixes with chocolate for a luscious texture; key for the ganache’s creaminess.
Indulge in crafting this Chocolate Turtle Dream Cake that’s sure to win over hearts at your next gathering!
Step‑by‑Step Instructions for Chocolate Turtle Dream Cake
Step 1: Preheat the Oven
Begin by preheating your oven to 350°F (175°C). While the oven warms up, prepare four 8-inch round cake pans by greasing them with butter and lightly dusting them with flour. This will help the cake layers release easily after baking, ensuring that your Chocolate Turtle Dream Cake looks as good as it tastes.
Step 2: Mix Dry Ingredients
In a large mixing bowl, combine all of your dry ingredients: all-purpose flour, granulated sugar, cocoa powder, baking soda, baking powder, and salt. Whisk them together thoroughly until they are well blended. This step not only combines the flavors but also aerates the dry mixture, which contributes to the cake’s light texture.
Step 3: Add Wet Ingredients
Now it’s time to add the wet ingredients! Incorporate eggs, vegetable oil, buttermilk, and vanilla extract into the dry mixture. Using an electric mixer, blend everything on medium speed for about 2 to 3 minutes until the batter is smooth and well combined. This creates a rich, velvety batter that will be the foundation of your Chocolate Turtle Dream Cake.
Step 4: Incorporate Hot Water
Next, carefully add the hot water to the batter, mixing until fully blended. The hot water is essential as it hydrates the batter and ensures a moist crumb. The batter will be quite thin at this stage, which is perfectly fine—this will help the layers bake up soft and fluffy.
Step 5: Bake the Cake Layers
Pour equal amounts of the batter into the prepared cake pans. Place them into the preheated oven and bake for 20 to 25 minutes. Keep an eye on them, and use a toothpick inserted into the center to check for doneness. It’s ready when the toothpick comes out clean or with a few crumbs clinging to it.
Step 6: Cool the Layers
Once baked, remove the cake layers from the oven and let them cool in the pans for about 10 minutes. This allows them to firm up slightly, making it easier to handle. After this time, run a knife around the edges of the pans to loosen the cakes before carefully turning them out onto a wire rack to cool completely.
Step 7: Assemble the Cake
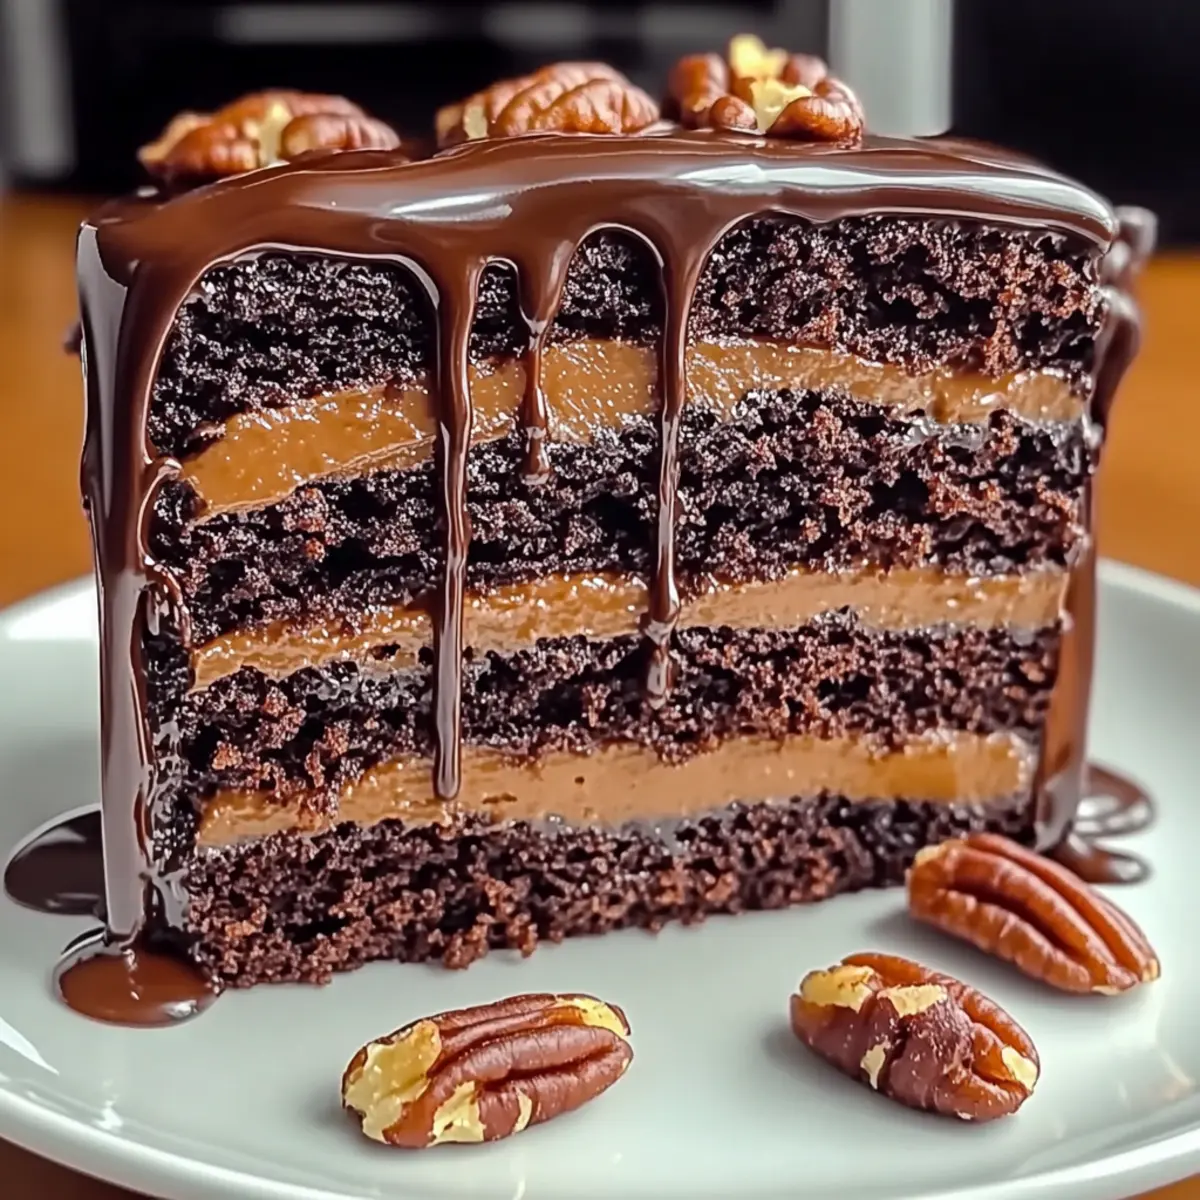
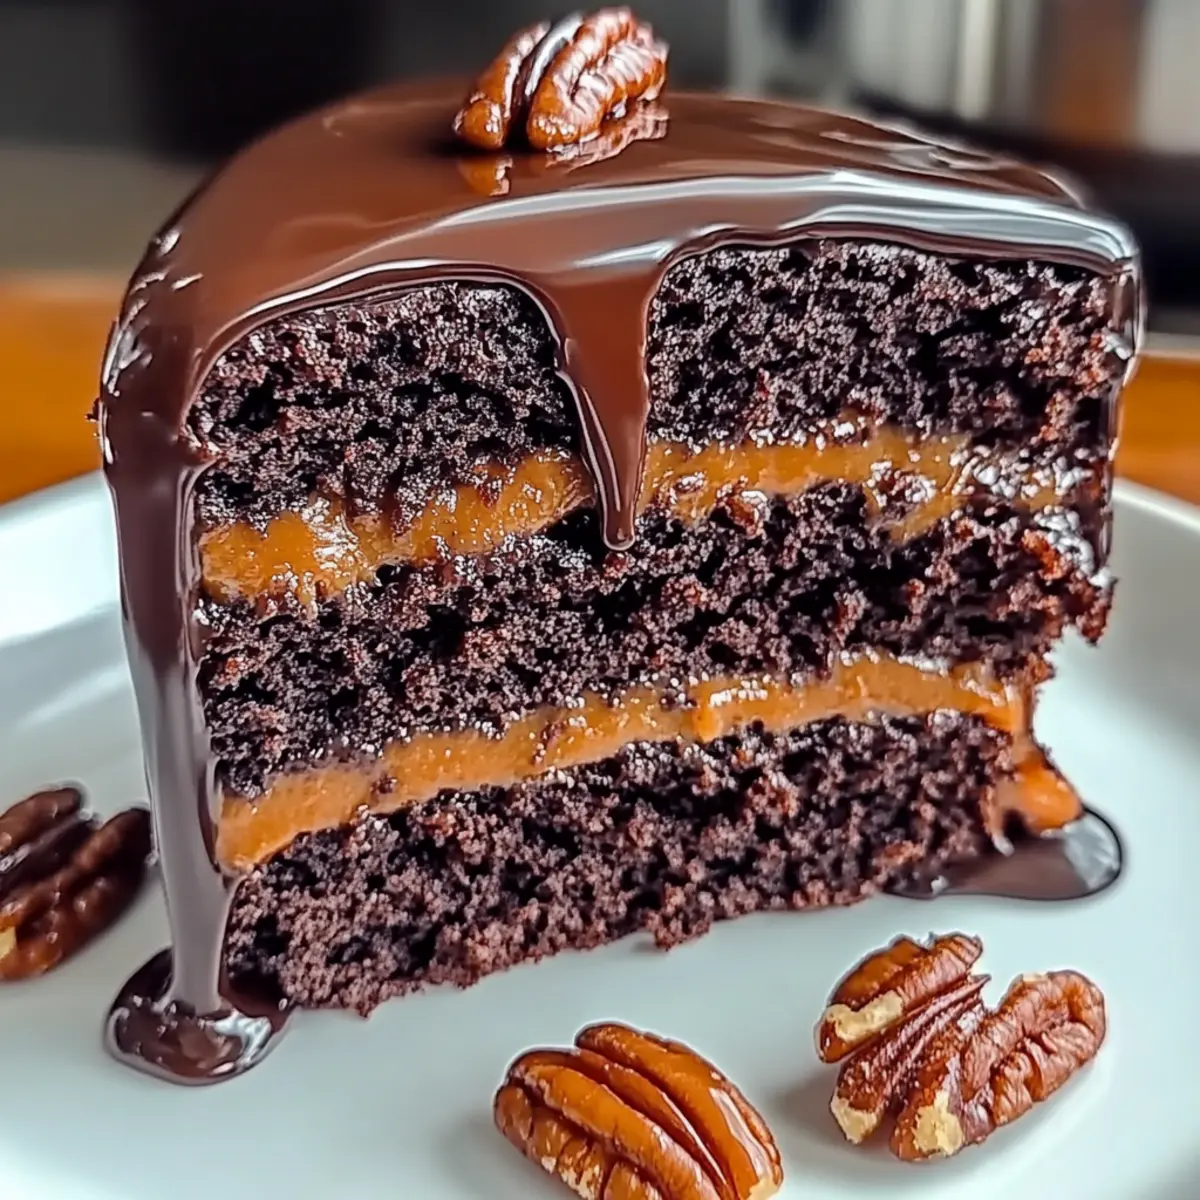
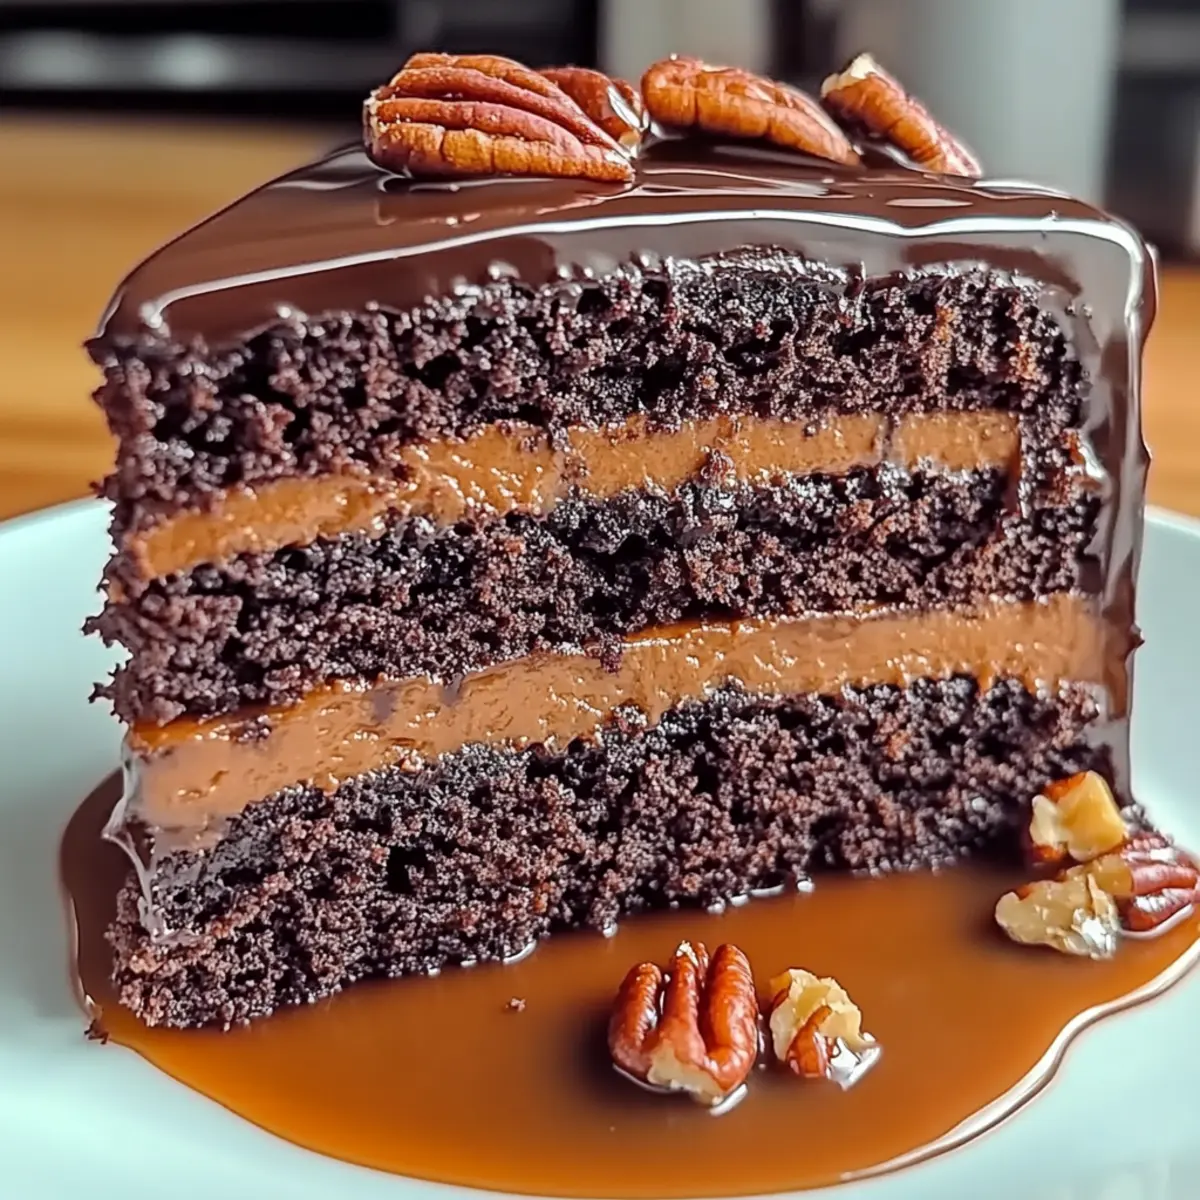
When the cake layers are completely cool, it’s time to assemble your Chocolate Turtle Dream Cake. Start by placing one layer on a serving plate or cake stand. Generously spread a layer of caramel sauce over the top and sprinkle with chopped pecans, then repeat this process with the remaining layers, finishing with the last layer on top.
Step 8: Prepare the Ganache
For the ganache, heat your heavy cream in a small saucepan until just barely simmering. Then, remove it from the heat and pour over semi-sweet chocolate in a mixing bowl. Allow it to sit for a few minutes before stirring until smooth. Let the ganache cool slightly before using to achieve the perfect pourable consistency.
Step 9: Glaze the Cake
Finally, drizzle the cooled chocolate ganache over the assembled cake, allowing it to flow down the sides for a stunning visual effect. If desired, garnish with additional chopped pecans on top for an extra pop of crunch and flavor. This finishing touch will surely elevate your Chocolate Turtle Dream Cake to a showstopper!
Chocolate Turtle Dream Cake Variations
Feel free to get creative and customize this delicious cake to suit your tastes or dietary needs!
-
Nut Options: Substitute pecans with walnuts or almonds for a delightful twist. The variation allows for different textures and flavors, making it equally delectable!
-
Dark Chocolate Delight: Opt for dark chocolate in the ganache for a richer, more intense chocolate experience. This version will elevate the chocolate flavor and make each bite even more indulgent.
-
Sea Salt Twist: Add a sprinkle of flaky sea salt atop the ganache for a sweet-salty contrast. This twist enhances the sweet caramel and chocolate, providing a gourmet touch you won’t want to miss.
-
Gluten-Free: Use a gluten-free flour blend to accommodate gluten sensitivities, ensuring everyone can enjoy this delightful treat without worry.
-
Homemade Caramel: Whip up a batch of homemade caramel sauce for a personal, heartfelt touch. It adds a warm flavor that complements the cake beautifully; you’re sure to impress your family and friends!
-
Cream Cheese Frosting: Replace the chocolate ganache with cream cheese frosting for a tangy twist that perfectly balances the sweetness of the cake. It’s a fantastic way to add dimension to your dessert!
As you think about variations, you might also enjoy pairing this cake with a slice of Banana Pudding Dream for an unforgettable dessert spread. Let your imagination lead the way, and savor every joyful moment!
Expert Tips for Chocolate Turtle Dream Cake
-
Room Temperature Ingredients: Ensure eggs and buttermilk are at room temperature for smoother blending and a better cake texture.
-
Measure Flour Accurately: Too much flour can make your cake dry. Use a kitchen scale or the spoon-and-level method for precise measurement.
-
Cool Layers Completely: Allow cake layers to cool completely to prevent the caramel from melting too much during assembly.
-
Control Ganache Temperature: Cool the ganache slightly before pouring for a perfect drip effect; it should be pourable but not too runny.
-
Explore Variations: Don’t hesitate to experiment with nut varieties or gluten-free flour to make this Chocolate Turtle Dream Cake uniquely yours!
Make Ahead Options
These Chocolate Turtle Dream Cake layers are perfect for meal prep, allowing you to whip up this crowd-pleaser in advance! You can bake the cake layers up to 3 days ahead. Once they’re cooled completely, wrap each layer tightly in plastic wrap and refrigerate to maintain moisture and prevent drying out. The ganache can also be prepared up to 24 hours ahead; simply store it in the fridge and reheat slightly before pouring for that luscious finish. For the best results, assemble the cake just before serving, layering it with caramel and pecans to keep the textures fresh and delightful. With these make-ahead tips, you’ll enjoy a stunning dessert with little last-minute hassle!
How to Store and Freeze Chocolate Turtle Dream Cake
- Room Temperature: Store the cake at room temperature for up to 3 days in an airtight container to keep it fresh and moist.
- Fridge: If you want to extend its life, refrigerate for up to a week. Be sure to cover it well to prevent drying out.
- Freezer: Freeze layers (without ganache) for up to 3 months. Wrap them tightly in plastic wrap to avoid freezer burn.
- Reheating: Thaw frozen layers overnight in the fridge before frosting to maintain the cake’s texture and flavor while serving.
What to Serve with Chocolate Turtle Dream Cake
Looking to create a complete culinary experience that complements your delightful cake?
-
Whipped Cream: A dollop of freshly whipped cream adds a creamy texture that perfectly balances the richness of the Chocolate Turtle Dream Cake.
-
Vanilla Ice Cream: The cold, creamy sweetness of vanilla ice cream pairs wonderfully with warm cake, enhancing each blissful bite.
-
Fresh Berries: A vibrant mix of strawberries, raspberries, or blueberries adds a refreshing contrast to the decadent chocolate, brightening the plate visually and flavor-wise.
-
Chocolate Sauce: Drizzling a bit of extra chocolate sauce over the top can intensify the chocolate flavor and satisfy any serious chocoholics.
-
Coffee: The robust flavor of a freshly brewed cup of coffee can enhance the richness of the cake, making it perfect for an afternoon treat or dessert after dinner.
-
Nutty Biscotti: Pairing slices of Chocolate Turtle Dream Cake with crunchy biscotti introduces a delightful texture contrast, enhancing the nutty pecan flavor found within the cake.
-
Caramel Latte: For a cozy drink option, a caramel latte echoes the caramel flavors of the cake while providing a delightful caffeine kick.
-
Salted Caramel Sauce: A little extra salted caramel drizzle can elevate both presentation and flavor, adding a touch of savory to the sweet balance you’ve established.
-
Dark Chocolate Truffles: For a more luxurious experience, consider serving rich dark chocolate truffles alongside the cake for an indulgent dessert exploration.
Chocolate Turtle Dream Cake Recipe FAQs
What type of flour should I use for the best results?
For this Chocolate Turtle Dream Cake, all-purpose flour is recommended as it provides the structure needed for the layers. However, if you’re looking to make it gluten-free, you can substitute it with a good quality gluten-free flour blend that includes xanthan gum for optimal texture.
How should I store the cake after baking?
You can store the cake at room temperature for up to 3 days in an airtight container to keep it fresh and moist. If you need it to last longer, refrigerate it for up to a week, ensuring it’s well covered to prevent it from drying out.
Can I freeze the cake layers? If so, how?
Absolutely! To freeze your Chocolate Turtle Dream Cake layers, allow them to cool completely after baking. Wrap each layer tightly in plastic wrap, then place them in a zip-top freezer bag to prevent freezer burn. They can be frozen for up to 3 months. When you’re ready to enjoy, simply thaw them overnight in the fridge before frosting or assembling.
What if my cake layers are too dense?
If your cake layers are dense, it might be due to overmixing the batter or using too much flour. Make sure to measure your flour correctly and mix just until the ingredients are combined. Also, using room temperature ingredients helps create a fluffier texture.
Is this cake safe for individuals with nut allergies?
This recipe does include pecans, which are a common allergen. If you’re baking for someone with nut allergies, it’s best to omit the pecans entirely or replace them with a nut-free option such as shredded coconut or additional chocolate chips for that added texture.
How do I achieve a perfect ganache consistency?
For the perfect ganache consistency, first heat the heavy cream until just simmering, then pour it over the chopped semi-sweet chocolate. Let it sit for a few minutes to melt the chocolate before stirring until smooth. Allow the ganache to cool slightly until it’s pourable, ensuring a beautiful drip effect on your Chocolate Turtle Dream Cake.
Indulge in the Best Chocolate Turtle Dream Cake Recipe
Ingredients
Equipment
Method
- Preheat your oven to 350°F (175°C). Grease four 8-inch round cake pans with butter and lightly dust with flour.
- In a large mixing bowl, combine all the dry ingredients: flour, sugar, cocoa powder, baking soda, baking powder, and salt. Whisk thoroughly.
- Add eggs, vegetable oil, buttermilk, and vanilla extract to the dry mixture. Blend for 2 to 3 minutes until smooth.
- Carefully add hot water to the batter, mixing until fully blended.
- Pour equal amounts of the batter into the prepared pans and bake for 20 to 25 minutes.
- Cool the cake layers in the pans for 10 minutes, then turn them out onto a wire rack.
- Assemble the cake by placing one layer on a serving plate, spreading caramel sauce and sprinkling pecans, and repeating.
- For the ganache, heat the heavy cream until simmering, then pour over the chocolate and stir until smooth.
- Drizzle the cooled ganache over the assembled cake, allowing it to flow down the sides.
Leave a Reply