
As I gathered colorful sprinkles and vibrant candy melts, a wave of excitement washed over me. Easter is not just about the chocolate eggs and blooming flowers; it’s a wonderful chance to get creative in the kitchen! Enter my Easter Cake Pops—adorable, bite-sized treats that transform simple cake into fun little eggs perfect for spring celebrations. Not only are they incredibly easy to make, but they also provide a wonderful opportunity for kids to join in on the fun. Plus, you can customize them with different flavors and decorations, making them a delightful treat for everyone at your gathering. Who wouldn’t want to dive into these festive delights? Let’s get started on creating sweet memories together with these colorful Easter Cake Pops!

Why Love These Easter Cake Pops?
Easy to Make: Even beginner bakers can whip these up with simple ingredients and straightforward steps.
Fun for Kids: Perfect for a family activity, kids will love shaping the cake pops and choosing their decorations!
Customizable: With endless flavor and topping variations, each bite can be a new adventure. Try using a Pudding Icebox Cake for silky flavor options!
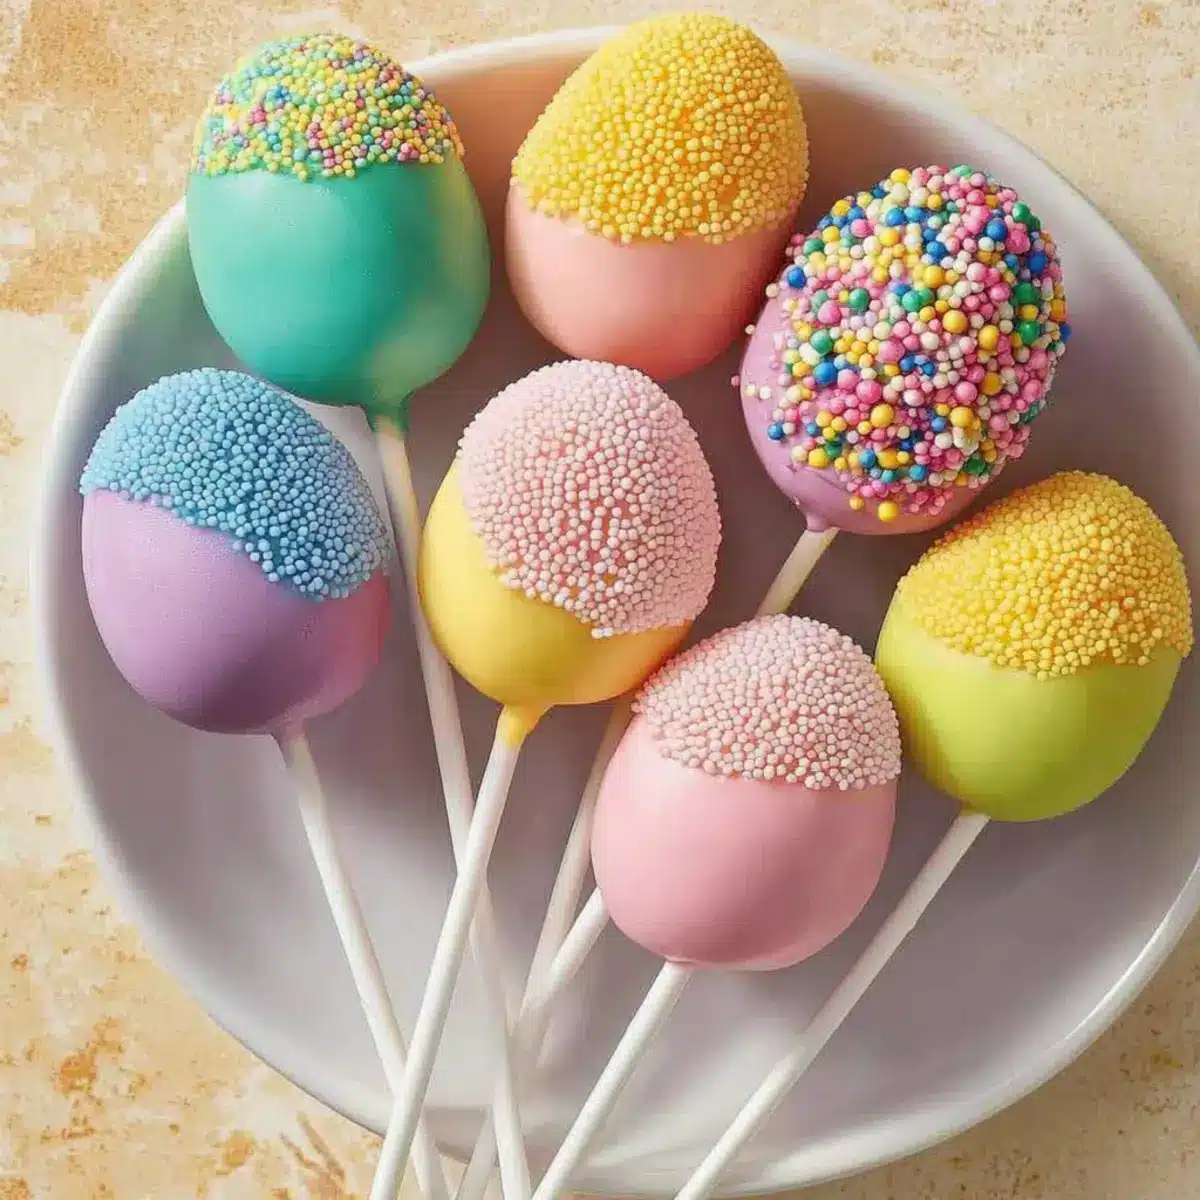
Vibrant Presentation: The colorful candy coating and playful sprinkles make them eye-catching treats for your spring gatherings.
Perfect for Sharing: Whether at an Easter brunch or as gifts, these pops are sure to delight friends and family alike!
Easter Cake Pops Ingredients
• Create your delightful treats with these essential ingredients!
For the Cake Base
- Cake Mix – Choose your favorite flavor like vanilla or chocolate for the perfect foundation.
- Frosting – This binds the cake crumbs together; use store-bought or homemade for convenience.
For Assembly
- Lollipop Sticks – Provide handles for easy enjoyment of your Easter cake pops.
- Candy Coating Disks – Melted and colored to match your spring theme, these create a delightful shell.
For Decoration
- Optional Toppings – Sprinkles, colored sugar, or assorted candies can be added for an extra fun finish.
With these vibrant ingredients, your Easter cake pops are sure to bring joy to every spring celebration!
Step‑by‑Step Instructions for Easter Cake Pops
Step 1: Prepare Cake
Start by baking your chosen cake mix in a greased 13×9-inch pan according to the package instructions, typically at 350°F (175°C) for 28-32 minutes. Keep an eye on it; the cake should be golden brown and a toothpick inserted in the center should come out clean. Once baked, allow the cake to cool completely on a wire rack.
Step 2: Crumble Cake
Once the cake is completely cool, break it into coarse crumbs using your hands in a large mixing bowl. Aim for a crumbly texture that resembles coarse sand, making it easier to mold into shapes later. Ensure there are no large lumps left, which could affect the final consistency of your Easter Cake Pops.
Step 3: Mix Frosting
Add about 1/4 cup of frosting to the crumbled cake, blending using your hands or a spatula until completely incorporated. The mixture should hold together when squeezed; add more frosting if needed to achieve a moldable consistency. This is key to ensuring your Easter Cake Pops maintain their shape without being overly moist.
Step 4: Shape Cake
Scoop approximately 2 tablespoons of the mixture and form it into egg shapes, slightly tapering one end for a realistic look. Place each shaped egg onto a plate lined with parchment paper and chill them in the refrigerator for 20-30 minutes. This firming up process makes them much easier to coat.
Step 5: Melt Candy Coating
While the cake eggs chill, melt your candy coating disks in a microwave-safe bowl. Heat them in 30-second intervals, stirring in between, until the mixture is smooth and fully melted. Aim for a consistency similar to that of peanut butter—it should easily drizzle off a spoon without being too runny.
Step 6: Assemble Pops
To start assembling your Easter Cake Pops, dip one end of a lollipop stick into the melted candy coating. Carefully insert it about halfway into the bottom of an egg-shaped cake pop. This helps ensure the stick stays firmly in place. Once inserted, spoon the melted coating over the egg to cover it completely, letting any excess drip back into the bowl.
Step 7: Decorate
While the coating is still wet, sprinkle on your chosen toppings—colorful sprinkles or colored sugar work beautifully for a festive look! Aim for an even distribution and be quick, as the candy coating will begin to set. After decorating, stick the cake pops upright into a foam block to allow the coating to set completely, which should take about 20 minutes.

Storage Tips for Easter Cake Pops
-
Room Temperature: Easter cake pops can be kept at room temperature for up to 2 days, but it’s best to store them in an airtight container to prevent them from drying out.
-
Fridge: For longer freshness, store your cake pops in the fridge for up to a week. Ensure they are in an airtight container to maintain their delightful texture.
-
Freezer: You can freeze cake pops for up to 3 months. Wrap each one individually in plastic wrap before placing them in a freezer-safe bag or container to avoid freezer burn.
-
Reheating: If needed, allow frozen cake pops to thaw in the fridge overnight before serving. Avoid microwaving, as this can cause the candy coating to melt and lose its crispiness.
Make Ahead Options
These Easter Cake Pops are an excellent choice for meal prep, allowing you to enjoy festive treats with minimal last-minute effort! You can prepare the cake base and shape the cake pops up to 24 hours in advance; simply chill the formed egg shapes until you’re ready to coat them. If you need even more time, you can freeze the shaped cake pops for up to 3 days—just ensure they’re well-wrapped to maintain freshness. When you’re ready to finish, melt your candy coating and decorate the pops as usual. This way, you can enjoy delightful Easter Cake Pops without the rush, keeping the joy intact!
Easter Cake Pops Variations & Substitutions
Feel free to let your creativity run wild and personalize these delightful cake pops to suit your taste and dietary preferences!
-
Flavor Variations: Try using red velvet or lemon cake mixes for a refreshing twist! Each flavor adds a new depth to the cake pops, making them even more enticing.
-
Dairy-Free: Substitute with almond milk or soy milk in the cake mix and use a dairy-free frosting. This swap ensures everyone can enjoy these festive treats!
-
Gluten-Free: Opt for a gluten-free cake mix and check that your frosting and candy coating are certified gluten-free. Everyone can savor the joy of Easter cake pops together.
-
Nutty Crunch: Add crushed nuts like almonds or pecans to your cake mixture for a delightful crunch. This adds an exciting texture that complements the sweetness beautifully.
-
Chocolate Drizzle: For a decadent finish, drizzle melted chocolate over the candy-coated pops. The rich chocolate layer will elevate their appeal and taste!
-
Spice It Up: Incorporate a dash of cinnamon or nutmeg into your cake mixture for a hint of warmth and spice. It’s a beautiful addition especially for spring gatherings!
-
Color Customization: Use colored candy melts to match any festive theme or celebration. Pastels for Easter or vibrant colors for children’s parties make them visually stunning.
-
Fruity Surprise: Fold in chopped fruits like strawberries or raspberries into your cake mixture for a fresh burst of flavor. Adding fruits brings another layer of fun to your cake pops!
Pair these customizations with your favorite treat, like a Blueberry Cheesecake Crumble or celebrate with a light touch of a Cream Cheese Pound Cake. Your creativity will surely make these Easter Cake Pops a memorable addition to your spring festivities!
Expert Tips for Easter Cake Pops
-
Temperature Management: Ensure cake pops are chilled only 20-30 minutes. Over-chilling can lead to cracks when coated with warm melted candy.
-
Crumbling Technique: For the best texture, crumble the cake by hand rather than using a food processor. This avoids overly fine crumbs that can create dense pops.
-
Coating Method: Spoon the melted candy over the cake pops instead of dipping them fully. This minimizes the risk of the heavier cake pops falling off the stick.
-
Decoration Timing: Add sprinkles or toppings while the candy coating is still wet to ensure they stick properly. Waiting too long may lead to toppings sliding off.
-
Storage Tips: Keep leftover Easter Cake Pops in an airtight container in the refrigerator for up to a week, ensuring they stay fresh and delicious.
What to Serve with Easter Cake Pops
Prepare to create a delightful spread that perfectly complements your festive treats!
- Fresh Fruit Salad: A refreshing mix of seasonal fruits adds brightness and balances the sweetness of the cake pops.
- Mini Quiches: These savory bites offer a nice contrast to the sweet cake pops, perfect for brunch or family gatherings.
- Fluffy Pancakes: Light and airy, pancakes served with a drizzle of maple syrup create a lovely brunch pairing that all ages enjoy.
- Sparkling Lemonade: This zesty drink adds a refreshing touch and is an irresistible accompaniment to your colorful cake pops.
- Chocolate-Covered Strawberries: A decadent pairing that echoes the sweetness of the cake pops while adding a touch of elegance to your dessert table.
- Carrot Cake Bites: A nod to the Easter theme, these mini desserts are spiced and delicious, harmonizing beautifully with your festive flavors.
- Vanilla Ice Cream: Creamy and dreamy, a scoop of vanilla ice cream is a comforting way to balance the vibrant flavors of the cake pops.
- Chocolate Milkshakes: For a rich and indulgent treat, these milkshakes provide everyone with an extra sweet thrill alongside the cake pops.
- Jelly Beans: Specifically for Easter, these playful candies can add a fun pop of color and make for a nostalgic nod to the holiday.
Easter Cake Pops Recipe FAQs
How do I select the right cake mix for my Easter cake pops?
Absolutely! Choose a cake mix that complements your flavor preference—vanilla and chocolate are popular, but don’t hesitate to explore options like red velvet or lemon for a fun twist. Check the expiration date to ensure freshness, and consider the seasonality of flavors; a lemon cake mix works wonderfully in spring!
What is the best way to store Easter cake pops?
Very! For optimal freshness, store your Easter cake pops in an airtight container. At room temperature, they can last up to 2 days, but when refrigerated, they’ll stay delicious for up to a week. Make sure they are fully cooled before storing to prevent moisture buildup.
Can I freeze my Easter cake pops, and if so, how?
Of course! Freezing is a great option. Individually wrap each cake pop in plastic wrap and then place them in a freezer-safe bag or container. They can be frozen for up to 3 months. To thaw, simply transfer them to the fridge the night before you plan to enjoy them. Avoid microwaving to keep that lovely candy coating intact!
What should I do if my cake pops are cracking after coating?
Oh no! If your cake pops are cracking, it might be due to over-chilling them before coating. Be sure to chill them for only 20-30 minutes. If your coating is too warm, it may also lead to cracks, so allow it to cool slightly before dipping. Always spoon the coating over instead of dunking to minimize the risk.
Are there any dietary considerations I should keep in mind?
Definitely! For a gluten-free option, use a gluten-free cake mix and double-check that all your other ingredients are also certified gluten-free. If you’re concerned about allergies, avoid nuts in your toppings and ensure your candy melts are free from common allergens. Always read labels carefully!
How can I make my Easter cake pops more colorful and fun?
The more, the merrier! After coating your pops with candy melts, sprinkle with colorful toppings like sprinkles or edible glitter while the coating is still wet. You can also use food coloring to dye white melting chocolate, creating a beautiful rainbow of colors for your cake pops, perfect for the festive season!

Easter Cake Pops: Fun, Colorful Treats for Spring Joy!
Ingredients
Equipment
Method
- Prepare your chosen cake mix in a greased 13x9-inch pan according to package instructions at 350°F (175°C) for 28-32 minutes.
- Once baked, allow the cake to cool completely on a wire rack.
- Break the cooled cake into coarse crumbs in a large mixing bowl.
- Mix in 1/4 cup of frosting until the mixture holds together.
- Form approximately 2 tablespoons of mixture into egg shapes and chill for 20-30 minutes.
- Melt candy coating disks in a microwave-safe bowl in 30-second intervals, stirring until smooth.
- Dip lollipop sticks into melted candy and insert into cake pops, covering them with melted candy.
- Decorate with sprinkles while the coating is wet and let them set in a foam block for about 20 minutes.
Leave a Reply