
The intoxicating aroma of slow-braised beef wafted through my kitchen, instantly transporting me to the vibrant streets of Jalisco. When I first tasted Quesabirria Tacos, I couldn’t shake the feeling that I had uncovered a hidden gem of authentic Mexican cuisine. With tender, seasoned beef enveloped in crispy corn tortillas and topped with gooey Oaxaca cheese, these tacos are not just another meal; they’re a celebration of flavor. The best part? They’re quick to whip up and a guaranteed crowd-pleaser, perfect for Taco Tuesdays or meal prepping for busy weeks. And don’t forget the dipping broth—savory and comforting—that elevates each bite to pure culinary bliss. Are you ready to elevate your taco game? Let’s dive in!

Why Are Quesabirria Tacos So Special?
Authenticity: Experience the rich tradition of Jalisco, where these tacos originated. Savory Delight: Each bite combines tender beef and gooey Oaxaca cheese, creating a mouthwatering harmony of flavors. Crispy Texture: The deep-fried corn tortillas provide a satisfying crunch with every taco. Quick & Easy: Perfect for busy weeknights or Taco Tuesdays, these tacos are easy to prepare, especially alongside Taco Tuesday Bliss. Crowd-Pleasing: Whether for family or friends, everyone loves the deliciousness of quesabirria. Dip & Savor: Don’t forget the flavorful birria broth for dipping—it’s the finishing touch that brings it all together!
Quesabirria Tacos Ingredients
Unlock the secrets behind these delicious tacos with this essential ingredient list!
For the Beef Birria
• Shredded Beef: – Slow-braised and marinated for an authentic flavor.
• Birria Broth (Consomé): – This savory broth enhances moisture and is essential for dipping.
For the Tacos
• Corn Tortillas: – Use thick, fresh tortillas to prevent tearing; avoid super soft ones.
• Oaxaca Cheese (or Monterey Jack): – Provides a creamy, melty texture. Choose quality for the best results.
Toppings
• Diced Red Onions: – Adds a fresh crunch; substitute with white onions for a sharper taste.
• Fresh Chopped Cilantro: – An optional but recommended herb for added authenticity.
• Limes: – Serve cut into wedges for a burst of acidity to enhance the flavors.
With these key ingredients, you’re well on your way to crafting unforgettable quesabirria tacos!
Step‑by‑Step Instructions for Quesabirria Tacos
Step 1: Prepare the Birria
Start by making your delicious beef birria according to your linked recipe. Slow-braise beef until tender, absorbing the marinade’s rich spices, then separate the meat from the broth. Allow the broth to simmer gently on low heat, keeping it warm for dipping later. This flavorful birria broth will be key to elevating your quesabirria tacos.
Step 2: Heat the Skillet
Place a large skillet or cast iron griddle over medium-high heat. Add a light drizzle of oil or cooking spray to coat the surface; this helps ensure the tortillas crisp up beautifully. As the skillet heats, gather your ingredients so that you can assemble your quesabirria tacos efficiently as you go along.
Step 3: Dip the Tortillas
Once your skillet is hot, take each corn tortilla and dip it into the warm birria broth, making sure both sides are well-coated. Let the excess broth drip off for a moment before placing the tortilla in the skillet. You’ll know the skillet is ready when the tortilla sizzles gently upon contact—this is crucial for achieving those perfect crispy edges.
Step 4: Cook the Tortilla
Allow the tortilla to cook for about 30 seconds on the first side until it starts to crisp and turn golden. Carefully flip the tortilla over, ensuring it maintains its shape. This step is important for creating the best base for your quesabirria tacos. The tortilla should be firm yet pliable for folding.
Step 5: Add Cheese and Beef
On one half of the tortilla, add approximately two tablespoons of your melted Oaxaca cheese, allowing it a moment to start melting. Then, layer on about a quarter cup of your shredded beef birria next to the cheese. This combination creates an irresistible filling that is both savory and rich, setting the stage for a delightful bite.
Step 6: Fold and Finish Cooking
Gently fold the tortilla over the beef and cheese, creating a half-moon shape. Press down lightly with a spatula and cook for another 30 to 60 seconds, or until the cheese has melted and the tortilla is crispy. This step ensures the contents meld beautifully, making your quesabirria tacos utterly delicious and satisfying.
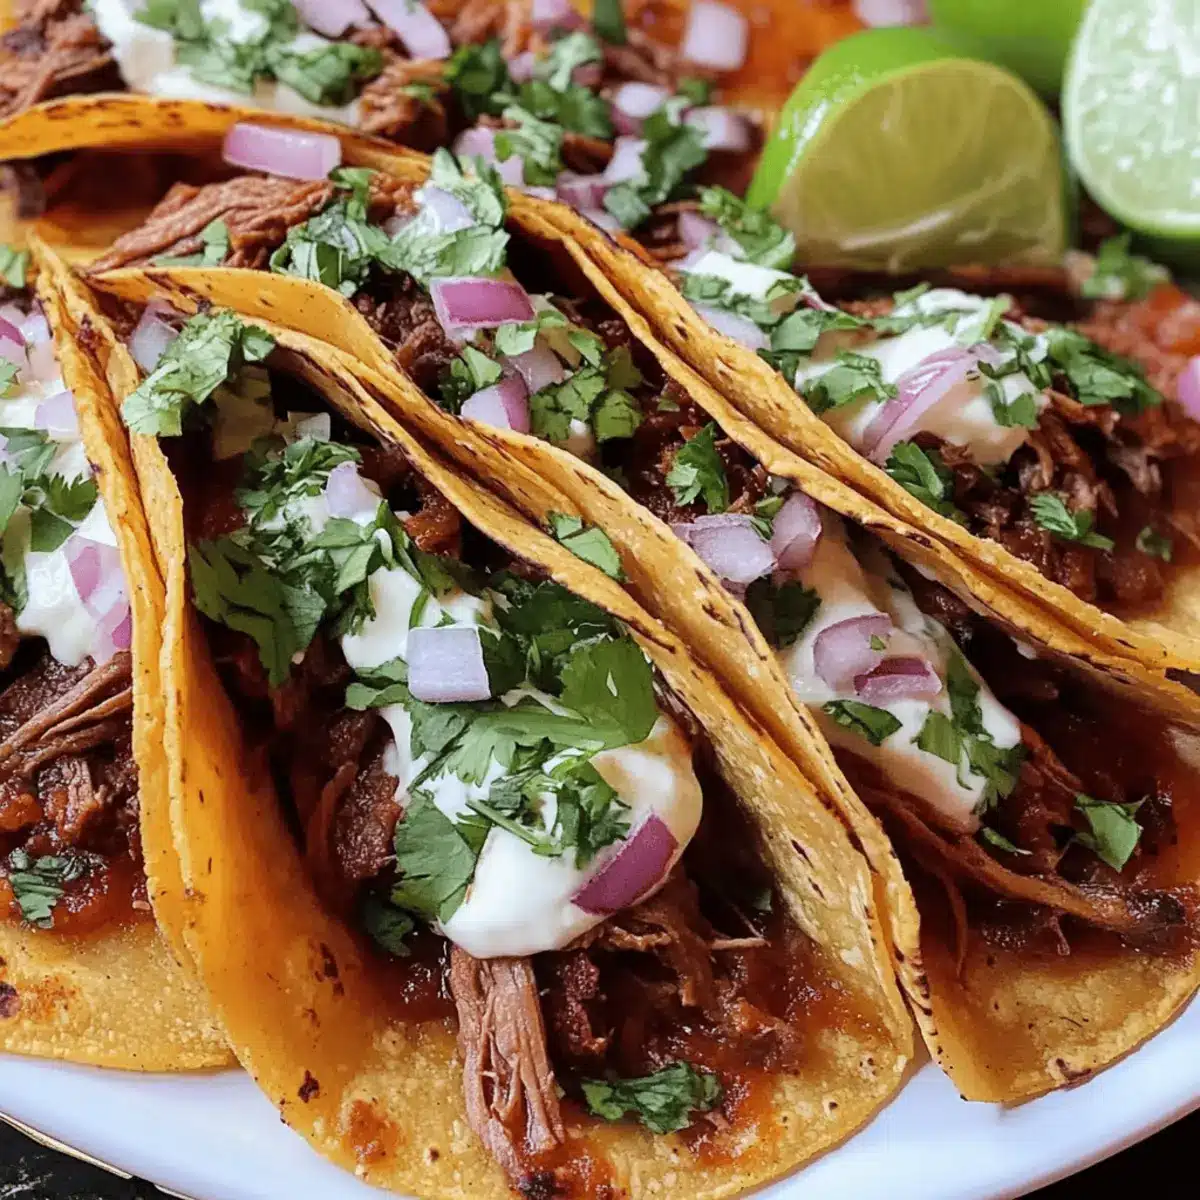
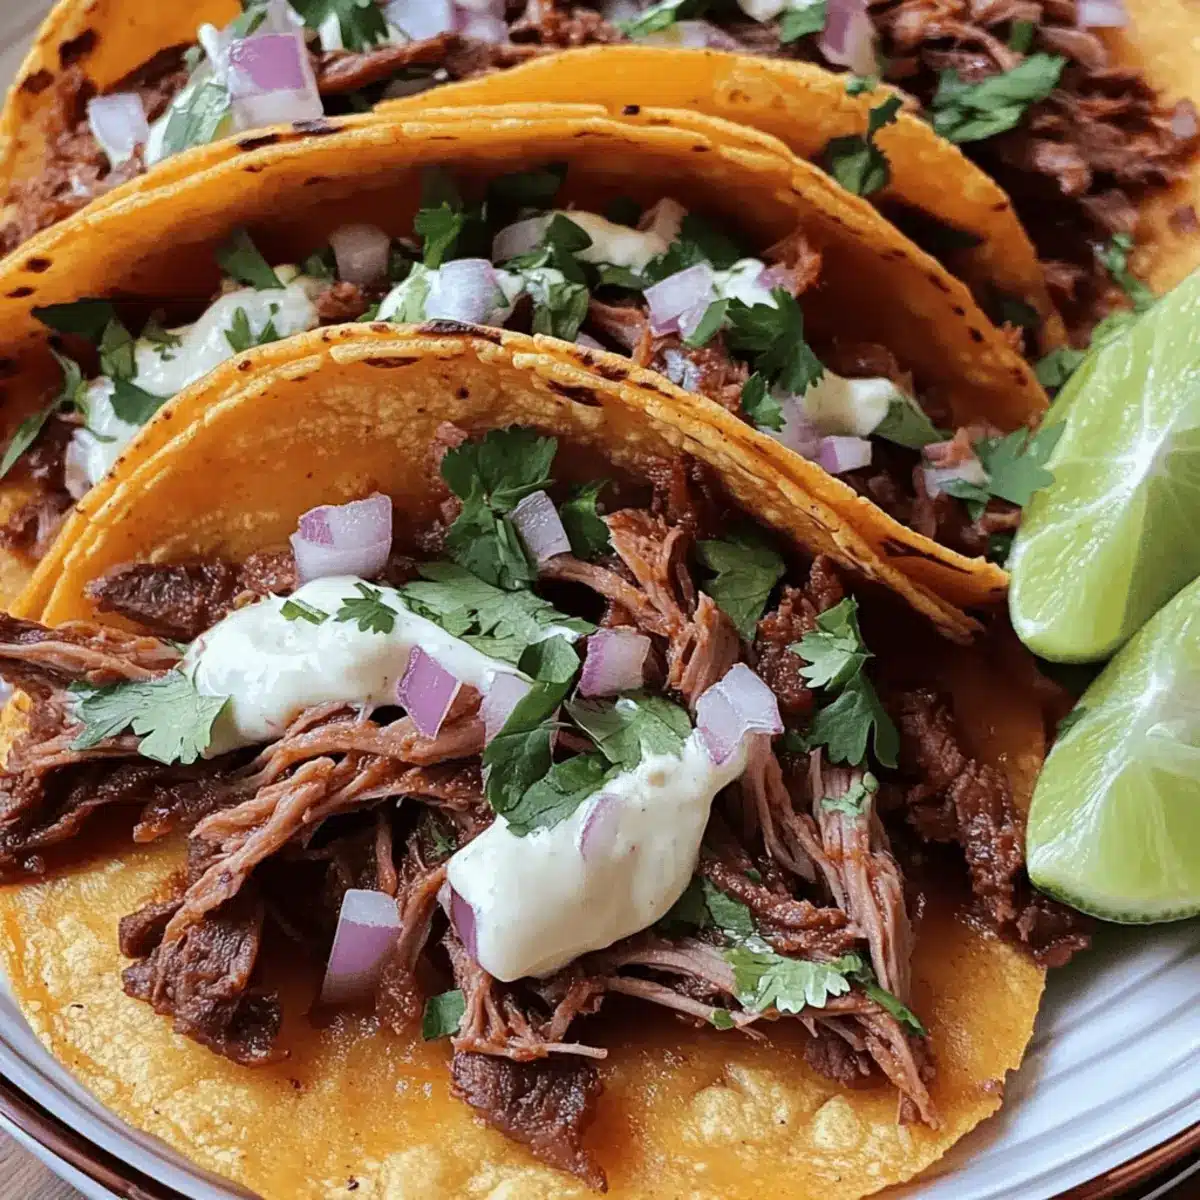
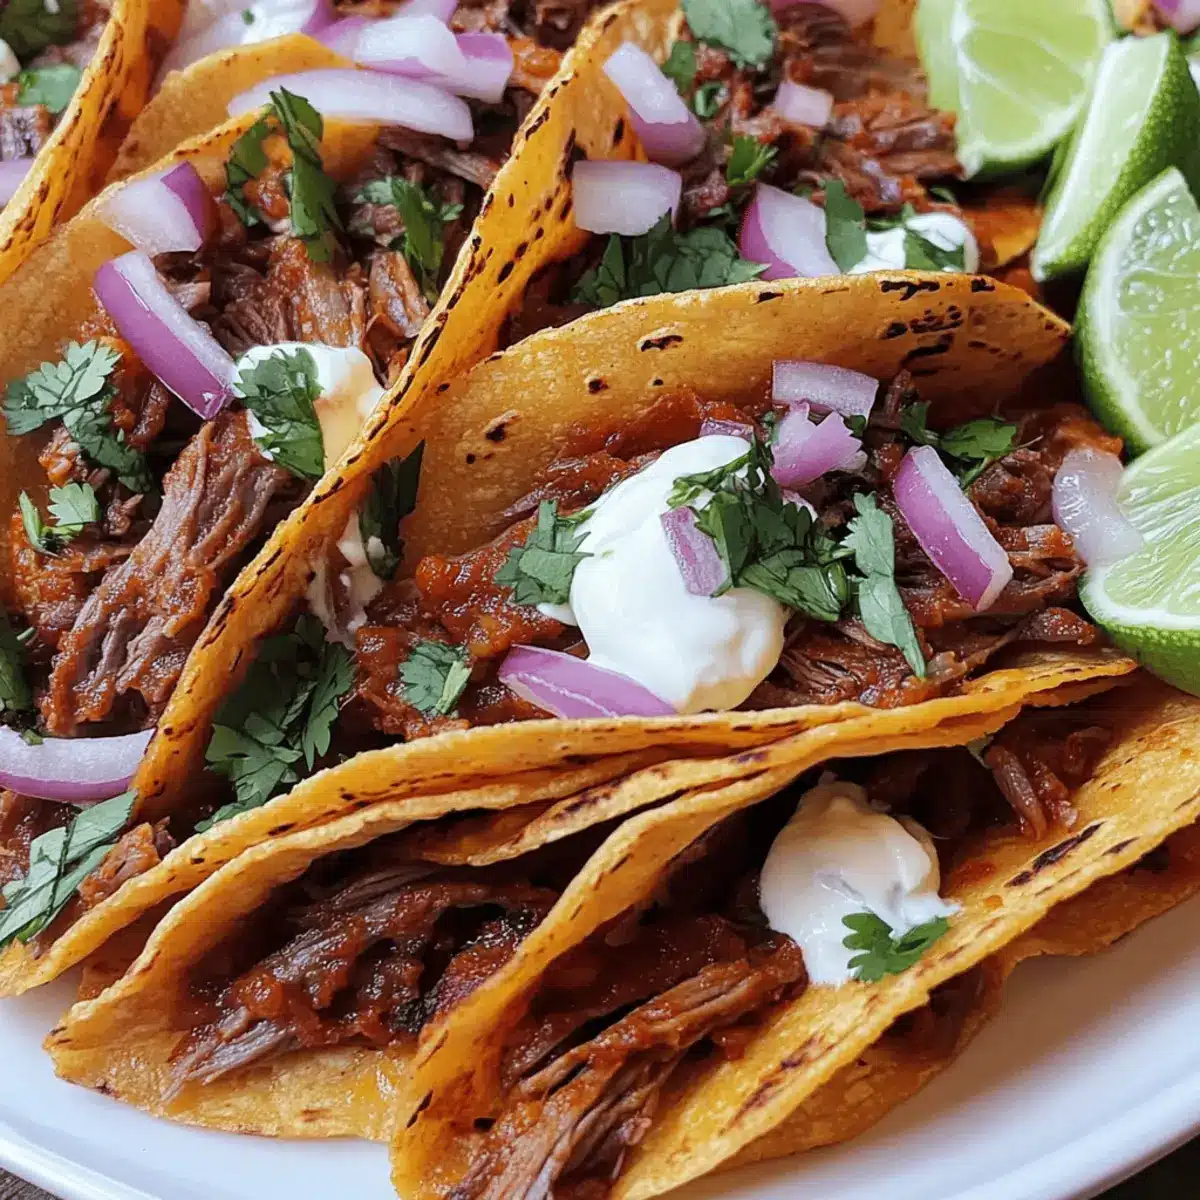
Step 7: Serve and Enjoy
Remove the finished quesabirria taco from the skillet and set it on a warm plate. Repeat the cooking process for the remaining tortillas, stacking them as you go. To serve, garnish with fresh diced onions and chopped cilantro, and don’t forget the lime wedges for a bright pop of acidity. Serve with the warm birria broth on the side for dipping, completing your authentic quesabirria tacos experience!
Make Ahead Options
These Quesabirria Tacos are perfect for meal prep enthusiasts! You can prepare the beef birria up to three days in advance, allowing the flavors to develop beautifully. Simply store the shredded beef and birria broth separately in airtight containers in the refrigerator. For the tortillas, you can dip them in broth and stack them (with parchment paper between) for up to 24 hours in the fridge without sacrificing quality. When you’re ready to assemble, just heat the skillet, add cheese and beef to your warmed tortillas, and cook for about 30-60 seconds. This way, you’ll have delicious quesabirria tacos with minimal effort, making busy weeknights a breeze!
Expert Tips for Quesabirria Tacos
- Fresh Tortillas Matter: Always use fresh, thick corn tortillas to prevent tearing during dipping; softer versions won’t hold up well.
- Perfect Skillet Heat: Preheat your skillet adequately for crispy tortillas; if it’s not hot enough, tacos may get soggy.
- Keep Ingredients Warm: Maintain the temperature of your birria meat and broth while assembling tacos for the best flavor infusion.
- Layering Technique: Don’t overload the tortillas; keep fillings moderate to ensure easy folding and an enjoyable eating experience.
- Crispy Option: For extra crunch, consider baking the filled tortillas after assembly with a light spray of cooking oil.
Quesabirria Tacos: Variations & Substitutions
Feel free to get creative with your Quesabirria Tacos and add your personal touch to elevate their deliciousness!
-
Gluten-Free: Use gluten-free corn tortillas to make this dish accessible for everyone at the table. They provide the same great flavor and crunch!
-
Different Meat: Swap the beef with goat or lamb for a unique twist that showcases traditional birria flavors. Each option has its own distinct taste profile.
-
Cheese Choices: If you can’t find Oaxaca cheese, Monterey Jack is a wonderful substitute, offering a similar creamy melt. Cheese is where the magic happens, after all!
-
Add Avocado: Slices of ripe avocado bring a luscious creaminess that pairs beautifully with the spicy, savory flavors of the meat. The contrast in texture is simply delightful.
-
Spicy Kick: For those who love a bit of heat, add spicy salsa or chopped jalapeños as a topping. They’ll send your taste buds on a thrilling adventure.
-
Flavor Bombs: Explore flavors by adding toppings like pickled red onions or fresh radishes for a zesty crunch. These can take your tacos to a whole new level!
-
Broth Variations: For a more robust flavor, consider simmering additional spices in your birria broth, like bay leaves or cinnamon sticks, for a richer dipping experience.
-
Crispy Finish: Try baking your assembled tacos in the oven for a few minutes for an extra crispy outer shell. This technique yields that satisfying crunch with every bite!
These variations will not only cater to different tastes and dietary needs but also help you create a Quesabirria experience everyone will love. If you’re also considering a delicious twist on tacos, check out these delightful Pumpkin Pie Tacos to switch things up! Enjoy the flavorful journey ahead!
How to Store and Freeze Quesabirria Tacos
Fridge: Store leftover quesabirria tacos in an airtight container for up to 3 days. Make sure they’re cooled before sealing to prevent sogginess.
Freezer: For longer storage, wrap each taco tightly in foil or plastic wrap and freeze for up to 1 month. Reheat from frozen for best texture.
Reheating: To reheat, place tacos on a skillet over medium heat for a few minutes until warmed through and crispy. Serve with the original birria broth for dipping.
Birria Broth Storage: Leftover birria broth can be stored in the fridge for up to 5 days or frozen for up to 3 months. This broth is perfect for adding flavor to future taco meals!
What to Serve with Authentic Quesabirria Tacos
Elevate your taco night with these delightful sides and accompaniments that perfectly compliment the rich flavors of the tacos.
- Creamy Guacamole: A smooth, avocado-based dip that adds a velvety texture, balancing out the juicy beef in every bite.
- Spicy Salsa Verde: This zesty, herbaceous salsa brings a refreshing kick, enhancing the savory depth of the quesabirria tacos.
- Crispy Mexican Street Corn: The charred sweetness of corn topped with creamy mayo and crumbled cheese creates a mouthwatering contrast to the tacos.
- Fresh Cucumber Salad: A bright and refreshing side with a light crunch, this salad cuts through the richness of the birria and cheese.
- Refried Black Beans: Silky and full of flavor, these beans provide a comforting and hearty element that complements the tacos beautifully.
- Margaritas: A classic drink pairing, the citrus notes of a fresh margarita harmonize wonderfully with the flavors in your tacos.
- Churros: End your meal on a sweet note; these crispy, cinnamon-coated pastries offer a delightful contrast to the savory tacos!
- Mexican Crema: Drizzle this tangy cream over your tacos for added richness and flavor. It’s a simple touch that elevates each bite.
- Pickled Red Onions: Their tangy, sweet crunch adds a burst of flavor that enhances the enjoyment of the quesabirria tacos.
- Lime Wedges: Freshly squeezed lime adds bright acidity, ensuring a balanced and delicious experience with every taco.
Quesabirria Tacos Recipe FAQs
How do I choose the best beef for birria?
Absolutely! For authentic quesabirria tacos, I recommend using cuts like chuck roast or brisket, which are ideal for slow-braising. Look for meat with good marbling, as this fat will keep the beef tender and juicy during the cooking process. The choice of high-quality, fresh beef is key to achieving that rich flavor!
What’s the best way to store leftover quesabirria tacos?
For sure! Store any leftover quesabirria tacos in an airtight container in the fridge for up to 3 days. It’s best to let them cool to room temperature before sealing to avoid sogginess. If you prefer, you can also separate the filling and the tortillas, storing each in its container for optimal freshness.
Can I freeze quesabirria tacos?
Yes, you can! To freeze quesabirria tacos, wrap each taco tightly in plastic wrap or aluminum foil. Place the wrapped tacos in a freezer-safe bag or container and freeze them for up to 1 month. When you’re ready to enjoy, heat them directly from the freezer by placing them in a skillet over medium heat until warmed through and crispy!
What if my tortillas tear when I dip them in broth?
Oh no! If your tortillas are tearing, it might be due to them being too thin or not fresh enough. Always opt for thick, fresh corn tortillas to avoid this issue. If you encounter this, try warming the tortillas slightly before dipping them in the broth, or simply coat them lightly instead of soaking them fully.
Are there any gluten-free options for quesabirria tacos?
Absolutely! Corn tortillas are naturally gluten-free, making them a great choice for those avoiding gluten. Be sure to check the packaging for any cross-contamination warnings. Also, ensure that your birria spices and broth are free from gluten-containing ingredients to keep the entire meal gluten-free and delicious!
What’s the proper way to reheat quesabirria tacos for the best texture?
For sure! To reheat quesabirria tacos and maintain their crispy texture, place them in a skillet over medium heat for about 3-4 minutes on each side, or until heated through and crisp again. Pair them with your leftover birria broth for dipping to bring back that delicious flavor combination!
Mouthwatering Quesabirria Tacos for Taco Tuesday Bliss
Ingredients
Equipment
Method
- Prepare the Birria: Slow-braise beef until tender and separate from broth. Keep broth warm for dipping.
- Heat the Skillet: Preheat a skillet over medium-high heat, adding a splash of oil to coat.
- Dip the Tortillas: Dip each corn tortilla in warm birria broth, coating both sides.
- Cook the Tortilla: Cook each tortilla for 30 seconds until golden, then flip.
- Add Cheese and Beef: Place melted cheese and shredded beef on one half of the tortilla.
- Fold and Finish Cooking: Fold the tortilla and press lightly, cooking until crispy.
- Serve and Enjoy: Garnish with diced onions, cilantro, and lime wedges, serving with broth on the side.
Leave a Reply