
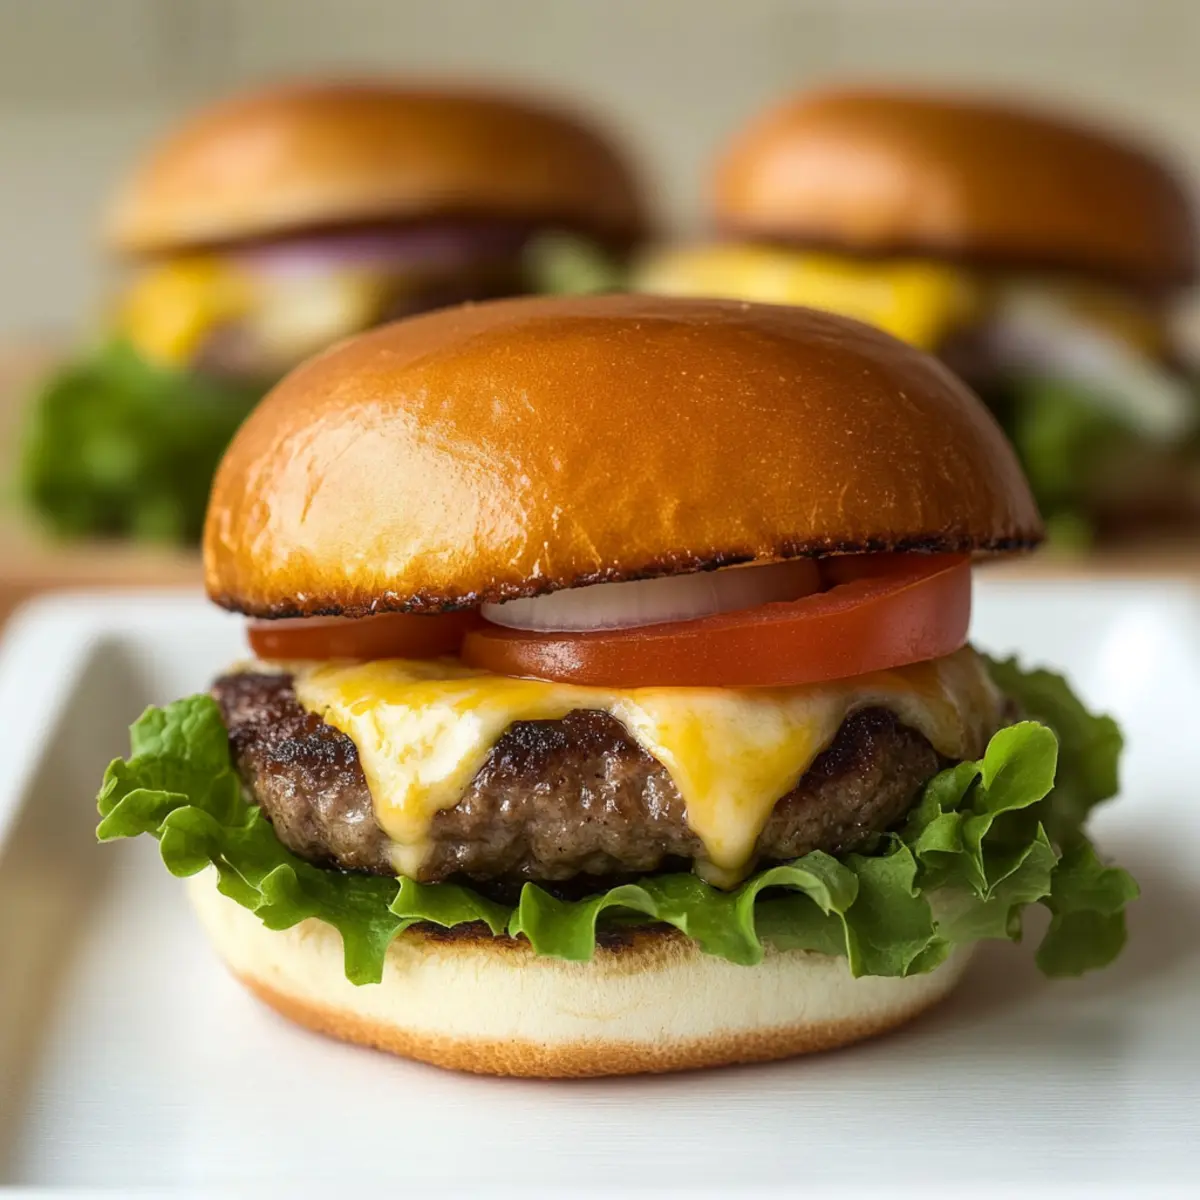
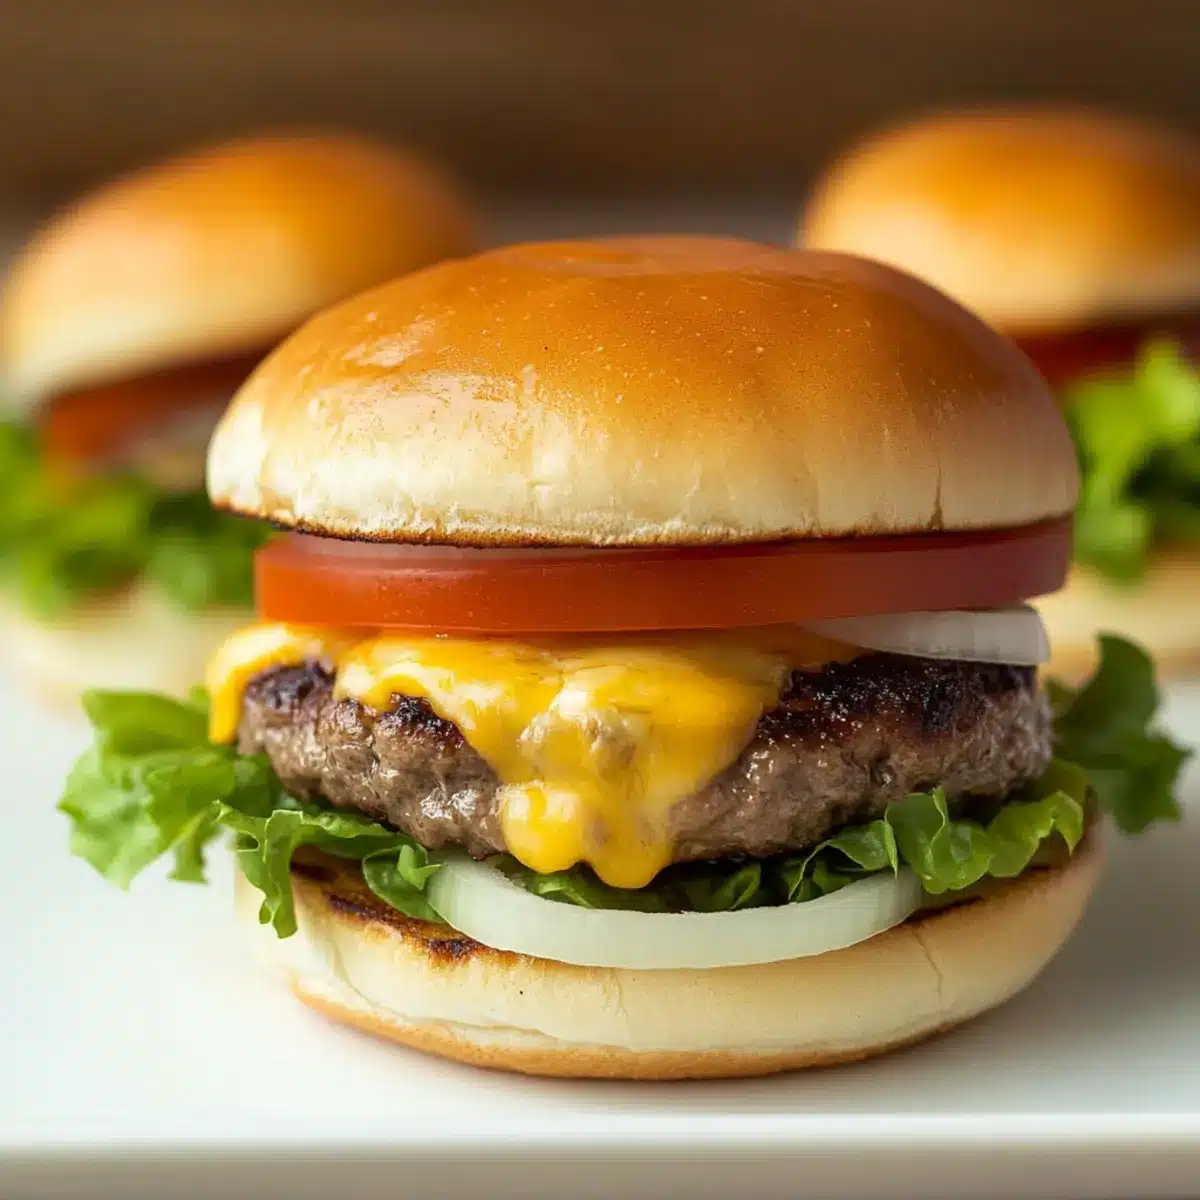
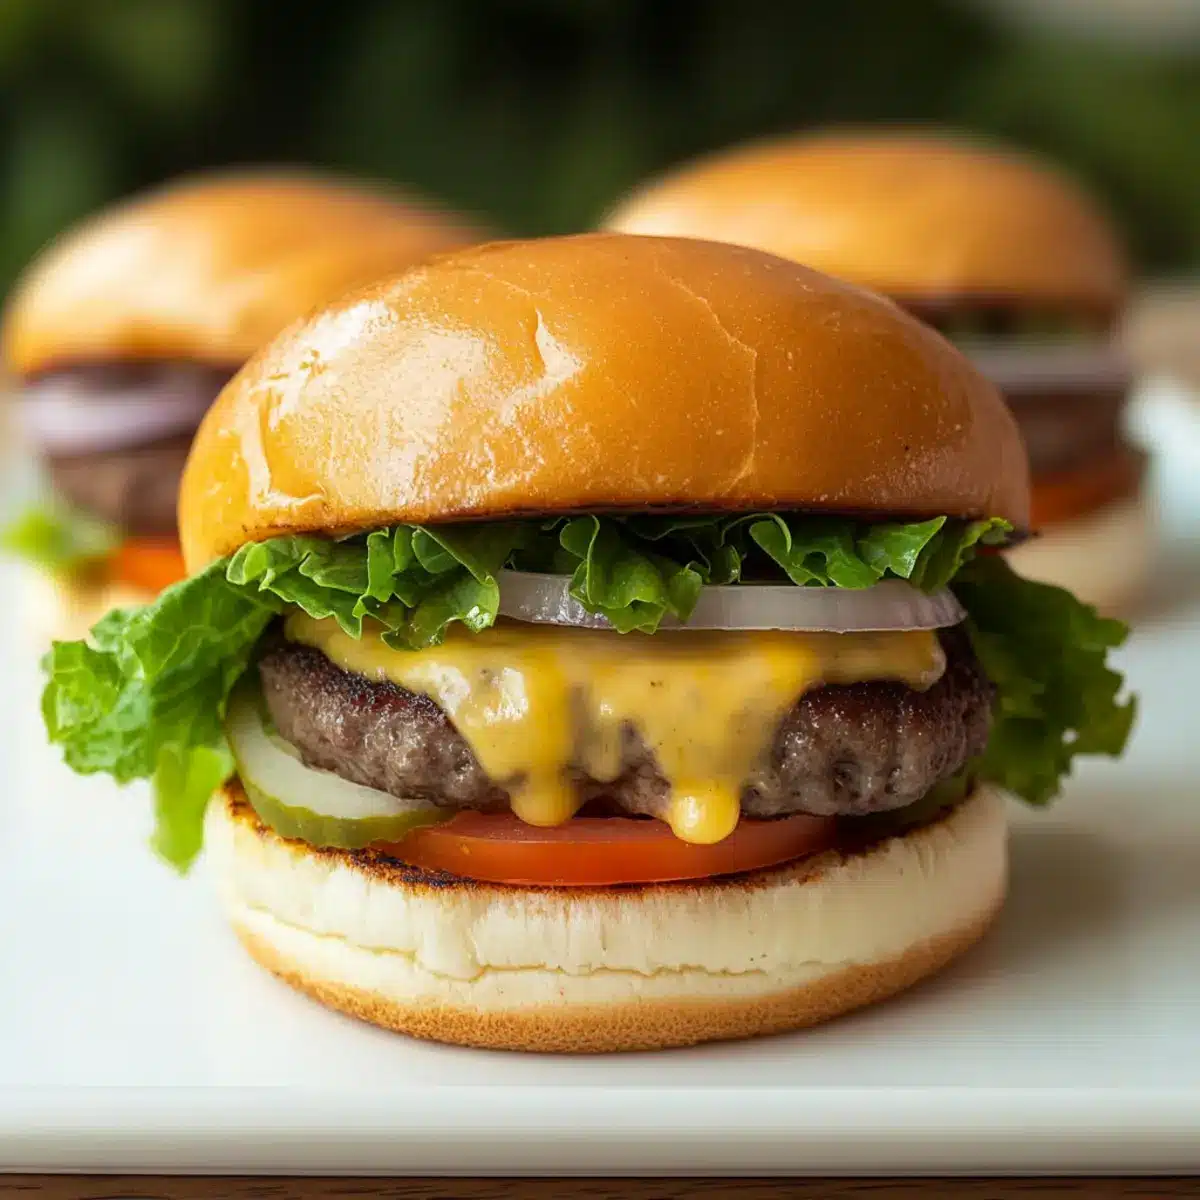
As I fired up the grill last summer, the sizzle of juicy beef patties danced in the air, transporting me straight to an unforgettable cookout with friends. That’s when I mastered the art of the Juicy Lucy burger—an American delight that features a gooey, cheese-stuffed center, bursting with flavor at every bite. This recipe is perfect for those warm evenings when you crave something satisfying yet simple; it’s both a crowd-pleaser and a stress-free option for entertaining. With just a few ingredients, including lean ground beef and your favorite cheese, you can create a gourmet experience right in your backyard. Are you ready to take your summer grilling game to the next level with this mouthwatering twist on the classic cheeseburger?

What Makes the Juicy Lucy Burger Unforgettable?
Irresistible Flavor: The oozing cheese center surprises every bite, making it a true standout among classic burgers.
Effortless Preparation: This recipe is quick and simple, perfect for busy weeknights or casual gatherings.
Customizable Options: Choose from a variety of cheeses and toppings to make your Juicy Lucy uniquely yours!
Party-Ready Appeal: Ideal for barbecues, it’s a crowd favorite that keeps everyone coming back for more.
Why not pair these with some crispy fries or a fresh side salad for a complete meal? Get ready for an epic grilling experience that’ll have everyone raving!
Juicy Lucy Burger Ingredients
For the Patty
• Lean Ground Beef – Opt for an 80/20 ratio for juicy tenderness.
• Water – Helps maintain moisture while grilling.
• American Cheese – Creates that signature melty core; feel free to swap with cheddar or mozzarella.
• Salt and Pepper – Essential for enhancing the natural flavors of the meat.
For Grilling
• Extra Virgin Olive Oil – Grease your grill for a perfect sear; high-smoke point oils work too.
For the Bun
• Burger Buns – Choose lightly toasted buns to prevent sogginess and hold everything together.
For the Toppings
• Green Leaf Lettuce – Adds a refreshing crunch and vibrant color.
• Sliced Tomatoes – Provides juicy flavor and balance to the richness of the burger.
• Sliced Onion – Offers a sharp bite; pick your favorite variety, like sweet or red onions.
• Pickles – Add a tangy crunch that complements the juicy beef.
• Ketchup, Yellow Mustard, Mayonnaise – Classic condiments that enhance the experience of your Juicy Lucy burger.
Step‑by‑Step Instructions for Juicy Lucy
Step 1: Preheat the Grill
Begin by preheating your grill or grill pan to a medium-high heat of about 375°F. This step is crucial for achieving that perfect sear on your Juicy Lucy burger. Allow the grill to heat for around 10-15 minutes, giving it ample time to reach the desired temperature.
Step 2: Prepare the Beef Mixture
In a large mixing bowl, combine the lean ground beef, water, salt, and pepper. Use your hands to gently mix until just combined, being careful not to overhandle the meat. The water will help maintain moisture while grilling, ensuring each bite of your Juicy Lucy is tender and juicy.
Step 3: Form the Patties
Divide the beef mixture into 8 equal portions, shaping each into a round patty. To create the cheese-filled center, take 4 of the patties and flatten them slightly. This is where the magic begins to happen, so make sure each is about ½ inch thick, ready for the most delicious cheese surprise.
Step 4: Add Cheese and Seal
Place 2 slices of American cheese on top of each of the 4 flattened patties. Then, take the remaining patties and place them on top, sealing the edges tightly. Press firmly around the edges to avoid any cheese leakage, ensuring your Juicy Lucy burger will burst with cheesy goodness when cooked.
Step 5: Season the Patties
Now it’s time to season each stuffed patty generously with salt and pepper. This step enhances the flavor of your Juicy Lucy burger and complements the creamy cheese center. Rub the seasoning into the patties for an even distribution, making sure each bite is flavorful.
Step 6: Grill the Patties
Brush your grill or grill pan with extra virgin olive oil to prevent sticking. Carefully place the patties on the hot grill, cooking for 5-6 minutes on one side. Look for a nice sear and golden-brown color, indicating that it’s time to flip and continue cooking to achieve that juicy, melty core.
Step 7: Flip and Finish Cooking
After flipping the Juicy Lucy burgers, cook for an additional 5-6 minutes on the other side. Use a meat thermometer to check for doneness; they should reach an internal temperature of 160°F for medium. Watch as delicious juices start to flow, sealing in that melted cheese.
Step 8: Rest the Patties
Once done, remove the patties from the grill and allow them to rest for 4-5 minutes off the heat. This resting period is essential for reabsorbing the juices, keeping your Juicy Lucy burger moist and flavorful with every bite.
Step 9: Assemble the Burgers
To assemble, start with your lightly toasted burger buns. Spread your favorite condiments like ketchup, mustard, or mayonnaise on the insides. Place a juicy patty on each bun and add toppings such as green leaf lettuce, sliced tomatoes, and onions. Customize these additions as desired, and get ready for an incredible flavor experience!
Juicy Lucy Variations & Substitutions
Don’t hesitate to let your creativity shine with these delightful twists on the classic Juicy Lucy burger.
-
Cheese Variety: Swap American cheese for cheddar or gouda to change the flavor profile. Each cheese adds a unique character, enhancing your burger experience.
-
Turkey Option: Use lean ground turkey instead of beef for a lighter alternative, maintaining the juicy center while cutting down on fat. It’s a delicious twist the whole family will love!
-
Spicy Kick: Mix in diced jalapeños or use pepper jack cheese for a spicy version that brings a whole new dimension to your burger. Just the right amount of heat can elevate this dish!
-
Vegetarian Delight: Replace beef with plant-based ground meat for a vegetarian-friendly Juicy Lucy. Enjoy the same gooey cheese surprise while being kind to the planet.
-
Flavorful Toppings: Consider adding flavor-rich toppings like avocado slices, crispy bacon, or caramelized onions. These additions bring depth and wonderful contrasts to your burger’s texture.
-
Mini Burgers: For a fun twist, create sliders by making smaller patties, ideal for gatherings or game day. Serve with a variety of dipping sauces for a crowd-pleasing platter!
-
Bun Alternatives: Try using sweet potato or lettuce wraps instead of traditional buns for a gluten-free or low-carb option. It keeps things light while letting the burger take center stage.
-
Gourmet Sauce: Experiment with gourmet sauces like sriracha mayo or garlic aioli to really punch up the flavor. These enhancements can transform your Juicy Lucy into an upscale burger experience.
For a taste of authentic flavor, don’t forget to check out our delicious Huli Huli Chicken as a side dish that complements your Juicy Lucy perfectly. And remember, the possibilities are endless—so invent your own variations and make this recipe truly yours!
Storage Tips for Juicy Lucy Burger
Fridge: Store leftover Juicy Lucy burgers in an airtight container for up to 3 days. Make sure they’re completely cooled before sealing to prevent moisture buildup.
Freezer: For longer storage, wrap the patties tightly in plastic wrap and then in aluminum foil. They can be frozen for up to 3 months; simply grill from frozen when ready to enjoy!
Reheating: To reheat, you can either grill or microwave the patties. If grilling, heat on medium until warmed through—about 3-5 minutes. This keeps the cheese melty and delicious!
Thawing: If frozen, thaw in the fridge overnight for best results before reheating. This helps maintain the juicy texture and flavor of your Juicy Lucy burger.
What to Serve with Juicy Lucy Burger
Elevate your meal with delightful sides and drinks that perfectly complement the cheesy indulgence of a Juicy Lucy burger.
-
Crispy French Fries:
Their golden crunch enhances the juicy burger experience, providing a satisfying contrast in texture. -
Coleslaw:
A fresh, tangy slaw adds crunch and balances the richness of the burger with a zesty kick. -
Grilled Vegetables:
Charred seasonal veggies like zucchini and bell peppers bring a smokiness that matches your summer grilling theme. -
Potato Salad:
Creamy and flavorful, this classic side is a comforting complement that pairs beautifully with the Juicy Lucy. -
Sweet Potato Fries:
Their natural sweetness pairs harmoniously with the savory burger, creating a delicious flavor combination. -
Garden Salad:
A light salad with crisp greens, tomatoes, and a vinaigrette introduces freshness, balancing the hearty burger. -
Beer:
An ice-cold lager or pale ale enhances the flavors and brings a refreshing element to the meal. -
Lemonade:
Fresh, tangy lemonade will cleanse your palate and offer a delightful contrast to the richness of the Juicy Lucy.
Make Ahead Options
These Juicy Lucy burgers are perfect for meal prep enthusiasts looking to save time on busy weeknights! You can prepare the beef patties up to 24 hours in advance by forming them and filling them with cheese, then sealing the edges tightly to prevent leakage during cooking. Store the patties in an airtight container in the refrigerator. Alternatively, you can freeze the assembled patties for up to 3 months; just make sure to lay them in a single layer with parchment paper between each to maintain quality. When you’re ready to grill, simply cook straight from frozen, adding an extra minute or two to the cooking time. With these make-ahead tips, you’ll enjoy juicy, mouthwatering burgers with minimal evening hassle!
Expert Tips for Juicy Lucy Burgers
-
Cheese Placement: Ensure cheese is centered: Place cheese slices in the middle of the patties, sealing edges tightly to prevent leakage during grilling.
-
Moisture Matters: Avoid dryness: Adding a small amount of water to the beef mixture helps retain moisture, making your Juicy Lucy even juicier.
-
Resting Time: Don’t skip resting: Letting your burgers rest after grilling for 4-5 minutes allows juices to redistribute, resulting in a tastier bite.
-
Patty Thickness: Keep it even: Shape patties to uniform thickness (½ inch) for consistent cooking and that perfect melty cheese center.
-
Season Generously: Season well: Don’t shy away from salt and pepper; they enhance the beef’s natural flavor and complement the cheese beautifully.
Juicy Lucy Burger Recipe FAQs
How do I choose the best ground beef for my Juicy Lucy burger?
When selecting ground beef, I recommend using an 80/20 meat-to-fat ratio. This combination ensures that your burger stays juicy and flavorful while cooking, providing a perfect base for that melted cheese center. Look for bright red color without any dark spots to ensure freshness.
What is the best way to store leftover Juicy Lucy burgers?
Leftover Juicy Lucy burgers can be stored in an airtight container in the fridge for up to 3 days. Make sure they are completely cooled before sealing to prevent moisture buildup. For longer storage, you can also wrap them tightly in plastic wrap, followed by aluminum foil, and freeze them for up to 3 months.
Can I freeze Juicy Lucy burger patties before cooking?
Absolutely! To freeze uncooked Juicy Lucy patties, place each patty on a parchment-lined baking sheet, ensure they are not touching, and freeze until solid. Then, transfer them to a freezer-safe bag or container. These frozen patties can be grilled directly from the freezer, making it super convenient for last-minute meals!
What should I do if the cheese leaks out while cooking?
If you experience cheese leakage, ensure that your patties are sealed tightly around the edges. You can also make a slight indentation in the center of the patty before adding the cheese. This helps create a pocket for the cheese and can prevent it from oozing out during grilling. Remember, a little practice makes perfect!
Are there any dietary considerations for the Juicy Lucy burger?
Yes! If you’re cooking for someone with cheese allergies or lactose intolerance, you can substitute cheeses with non-dairy options like cashew cheese or nutritional yeast. For a healthier twist, ground turkey or plant-based meats can be used instead of beef, providing a lighter yet delicious alternative to the classic Juicy Lucy.
How do I achieve the perfect grill marks on my Juicy Lucy burger?
To achieve those beautiful grill marks, preheat your grill to medium-high heat before placing your patties down. Allow the patties to cook undisturbed for 5-6 minutes on each side. When you flip them, they should easily release from the grill, ensuring an appealing sear while locking in those juiciness and flavors!
Juicy Lucy: The Ultimate Cheese-Stuffed Burger Experience
Ingredients
Equipment
Method
- Preheat your grill or grill pan to a medium-high heat of about 375°F.
- Combine the lean ground beef, water, salt, and pepper in a mixing bowl and gently mix until just combined.
- Divide the beef mixture into 8 equal portions and shape each into a round patty.
- Flatten 4 of the patties slightly to create cheese-filled centers and place 2 slices of cheese on each.
- Place the remaining patties on top and seal the edges tightly to avoid cheese leakage.
- Season each stuffed patty generously with salt and pepper.
- Brush your grill with olive oil and carefully place the patties to cook for 5-6 minutes on one side.
- Flip the patties and cook for an additional 5-6 minutes, checking for an internal temperature of 160°F.
- Remove the patties from the grill and allow them to rest for 4-5 minutes.
- Assemble the burgers on toasted buns with your choice of condiments and toppings.
Leave a Reply